
Certain applications demand low-latency, bidirectional communication for optimal performance, particularly messaging apps and social media networks that rely on constant feed updates. Building these applications with HTTP often results in latency issues, as HTTP was not designed for two-way messaging. While HTTP polling can mimic bidirectional communication, it is resource-intensive and complex to implement, serving more as a workaround than a robust solution.
To address these challenges, WebSockets provide an ideal solution for communication-heavy applications. Unlike HTTP, WebSockets are specifically designed for two-way communication and are significantly less resource-intensive. The fundamental difference between these protocols is evident in their URLs: HTTP uses http://, while WebSocket URLs start with ws://. WebSockets operate through a persistent communication channel, allowing continuous data exchange between the client and server.
Given their established presence in the tech landscape, numerous comprehensive libraries are available for creating WebSocket servers in Python or JavaScript, abstracting away the low-level details and simplifying the development process.
In this article, we will demonstrate how to create a WebSocket server using Python, alongside a command-line client interface for testing the server. This setup will enable multiple users to connect to a single room and exchange messages in real-time, showcasing the efficiency and practicality of WebSocket communication in modern applications.
Use Cases for WebSocket Servers
WebSocket servers enable a broad range of real time applications:
- Voice Bots: that can interact with users and perform actions e.g. scheduling a meeting with a support team after an initial with the customer.
- Real-Time Assistance: for e.g. for sales team to assist in information extraction and objection handling, improving customer satisfaction and conversions.
Scaling a WebSocket Server
Scaling a WebSocket server to handle a large number of simultaneous connections and high throughput can be challenging. One effective strategy is to use a load balancer to distribute connections across multiple WebSocket servers, preventing any single server from becoming a bottleneck. Additionally, deploying multiple instances of your WebSocket server, known as horizontal scaling, can manage increased load. It’s important to ensure that your architecture supports state synchronization between instances if necessary. Efficient resource management is also crucial; optimizing your server’s resource usage by managing connections and memory efficiently, and employing asynchronous programming to handle multiple connections concurrently without blocking, can significantly enhance performance. Lastly, consider using managed WebSocket services from cloud providers like AWS, Azure, or Google Cloud, which offer built-in scalability and reliability.
Prerequisites
To follow this tutorial, you’ll need a working installation of a recent version of Python 3. We recommend you install the latest version on your machine.
Additionally, the WebSockets protocol supports asynchronous communication, so this tutorial will use asyncio for the server. Because of that, some familiarity with asynchronous programming is an asset.
How to Create a WebSocket Server with Python
Project Setup
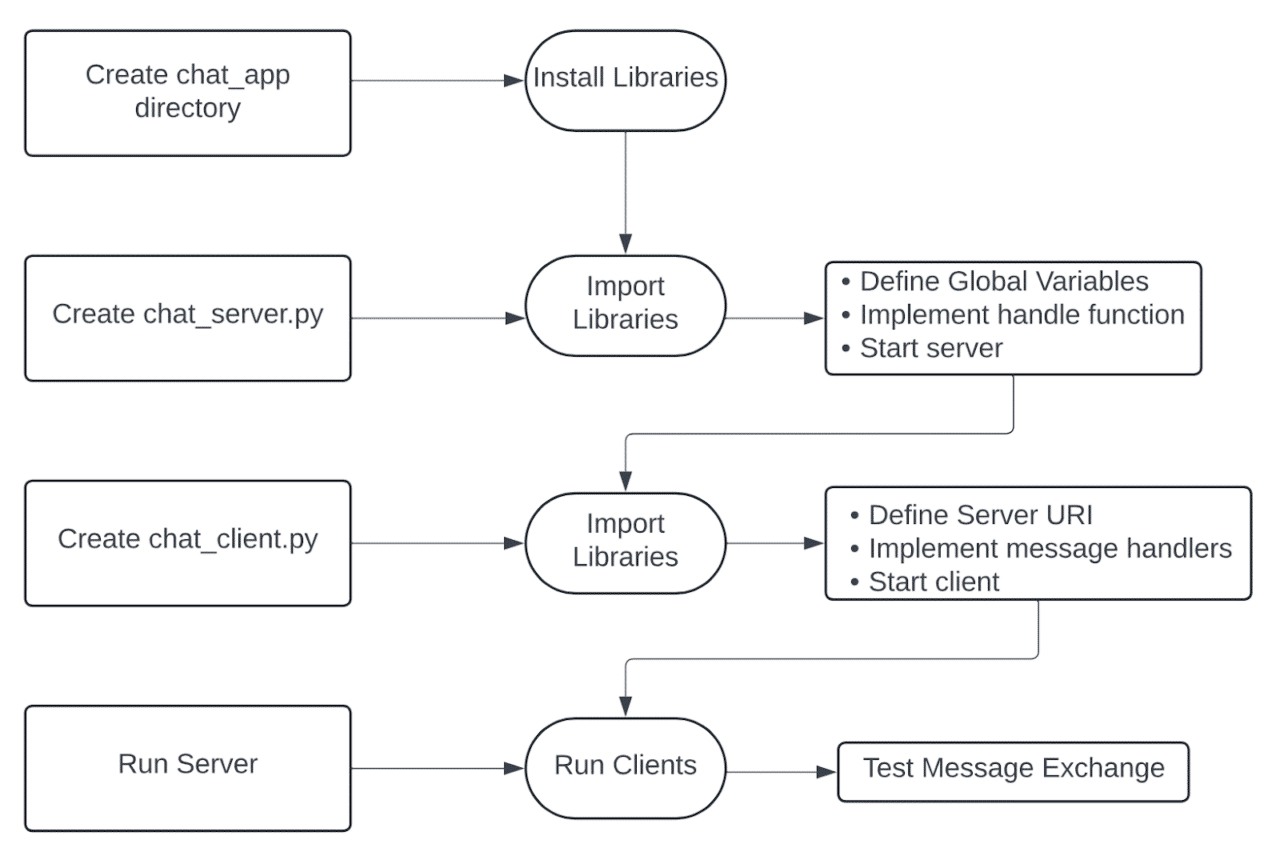
To get started, create a new directory called chat_app. Then, open that directory in the code editor of your choice.
For this tutorial, you’ll use three libraries: asyncio (for async programming in Python), websockets (for managing WebSocket connections), and aioconsole (to write and read from console asynchronously).
Although asyncio is available by default in the standard library, you need to install the other two libraries by running:
pip install websockets aioconsole
on your terminal or command prompt. After that, create two files: chat_server.py and chat_client.py.
Create the Server
Open chat_server.py. This is where you’ll write all the code for your WebSocket server, the core application responsible for hosting the chat room.
Here’s an overview of how the server will function: Clients will connect to the server and be assigned a random username. Once connected, they can send messages to the server. The server will log these messages locally by printing them and then broadcast them to all connected clients. This setup ensures that every participant in the chat room can see the messages in real-time, facilitating seamless communication.
To create the server, start by adding import statements for the following libraries in the file:
import asyncio
import websockets
Then, create a global variable for all of your connections:
connected = []
To generate usernames, this tutorial will use a dictionary instead of a real random generator. Add this to the file as a global variable as well:
username_generator = {
    0: "VerdantPostbox",
    1: "PrudentNecktie",
    2: "BreezyCocktail",
    3: "HelpfulPoodle",
    4: "ReassuringSpeedboat"
}
After that, you need to create a handle function that will handle the incoming requests. On a high level, this function will take each incoming WebSocket connection, add it to the list of active connections, and make sure to propagate the messages of each client to all the other clients.
Since this function does a lot, we’ll look at it part by part. But, so that you know what to expect, here’s the full code for the function:
async def handle(websocket):

    user_count = len(connected)
    username = username_generator.get(user_count)
    print(f"{username} has joined")
    connected.append((websocket, username))

    try:
        async for message in websocket:

            formatted_message = f'{username}: {message}'
            print(formatted_message)

            for (user, id) in connected:
                if user != websocket:
                    await user.send(formatted_message)
                else:
                    pass

    except websockets.exceptions.ConnectionClosed:
        disconnected = list(filter(lambda x: x[0] == websocket, connected))

        for user in disconnected:
            connected.remove(user)
            print(f'{user[1]} left')
So what’s happening here?
First, whenever a new connection happens, the handle function needs to assign a random username to the user and print a notification that the user has connected to the server.
Below is the piece of code that is responsible for doing this. It gets the current user count, uses it as the input for the mock generator, prints out the “user has joined” notification, and then appends the WebSocket connection to the list of active connections.
async def handle(websocket):

    user_count = len(connected)
    username = username_generator.get(user_count)
    print(f"{username} has joined")
    connected.append((websocket, username))

connected.append((websocket, username))
After registering a user, the function needs to format and print any messages that it receives through that user’s WebSocket connection.
Below is the code responsible for handling those messages. It loops through the messages in the WebSocket connection.
async for message in websocket:

        formatted_message = f'{username}: {message}'
        print(formatted_message)
Then, the server needs to send each message to all the other clients that are connected. This can be done by looping through the list of connected users, like this:
for (user, id) in connected:

  if user != websocket:

    await user.send(formatted_message)

  else:

    pass
But what if a user gets disconnected? To handle that, you need to wrap the messaging logic in a try/except block that will catch the exception of the user disconnecting and remove them from the connection list:
   try:
        async for message in websocket:

            formatted_message = f'{username}: {message}'
            print(formatted_message)

            for (user, id) in connected:
                if user != websocket:
                    await user.send(formatted_message)
                else:
                    pass

    except websockets.exceptions.ConnectionClosed:
        disconnected = list(filter(lambda x: x[0] == websocket, connected))

        for user in disconnected:
            connected.remove(user)
            print(f'{user[1]} left')
Once you’ve added all of these code snippets to your handle function, it’s ready.
Now, you need to make sure that this function is served on a location and port. To do that, you’ll use websockets.serve and asyncio.
First, create a variable for the server function. The following variable will contain a function to serve the server locally on port 8765:
start_server = websockets.serve(handle, "localhost", 8765)
Then, use asyncio to run it forever using the following commands:
asyncio.get_event_loop().run_until_complete(start_server)

asyncio.get_event_loop().run_forever()
The simple chat server is now done! Here’s the full code:
# chat_server.py

import asyncio
import websockets

connected = []

username_generator = {
0: "VerdantPostbox",
1: "PrudentNecktie",
2: "BreezyCocktail",
3: "HelpfulPoodle",
4: "ReassuringSpeedboat"
}

async def handle(websocket):

    user_count = len(connected)
    username = username_generator.get(user_count)
    print(f"{username} has joined")
    connected.append((websocket, username))

    try:
        async for message in websocket:

            formatted_message = f'{username}: {message}'
            print(formatted_message)

            for (user, id) in connected:
                if user != websocket:
                    await user.send(formatted_message)
                else:
                    pass

    except websockets.exceptions.ConnectionClosed:
        disconnected = list(filter(lambda x: x[0] == websocket, connected))

        for user in disconnected:
            connected.remove(user)
            print(f'{user[1]} left')


start_server = websockets.serve(handle, "localhost", 8765)

asyncio.get_event_loop().run_until_complete(start_server)
asyncio.get_event_loop().run_forever()
Test the Server
To ensure everything is working correctly, test the server out with the websockets interactive client.
To do so, start by running the server using the python3 chat_server.py command in your terminal. This command will serve it locally via port 8765.
Then, open two other terminals. In those, you need to run python3 -m websockets ws://localhost:8765/.
After that, you’ll be able to type messages in both of those terminals and have them appear in the other terminal. All of the messages will also be printed out in the terminal in which you have the server running.
Create the Client
To make better use of the server, you need a client. For this tutorial, you’ll create one with Python.
The client will be quite similar to the server, but in contrast to the server, it needs to handle both user input and read/write functionality on the WebSocket.
Create the client in the chat_client.py file. Start by importing the required libraries:import asyncio
import websockets
import aioconsole
Then, you need to write the main function.
First, define the URI of the server you’re connecting to. The client will connect to that URI and print an announcement in the console.
async def main():
uri = "ws://localhost:8765"
print("You can now chat with other people in the room!")
After that, connect to the server. This can be done with the websockets.connect method. After the client connects, it will simultaneously handle both the loop of receiving messages and the loop of sending messages with asyncio.gather:
async with websockets.connect(uri) as websocket:
await asyncio.gather(
received_message_handler(websocket),
sent_message_handler(websocket)
)
But, right now, there are no functions with such names. You’ll need to create them. Remember to put them on top of the main() function in the file.
First, create the received_message_handler. It’s a simple loop that will wait for a message and then print it out asynchronously on the console. The snippet aprint is the same as print, but asynchronous.
async def received_message_handler(websocket):
while True:
message = await websocket.recv()
await aioconsole.aprint(message)
Then, create the sent_message_handler. It’s also a simple loop that will wait for a message to be typed in the console and then send it to the server. Again, ainput is the same as input, but asynchronous.
async def sent_message_handler(websocket):
while True:
message = await aioconsole.ainput()
await websocket.send(message)
Then, because you need the client to run until you stop it, add this at the bottom of the code:
asyncio.get_event_loop().run_until_complete(main())
asyncio.get_event_loop.run_forever()
The client is now ready! The full client code is below:
# chat_client.py
import asyncio
import websockets
import aioconsole
async def received_message_handler(websocket):
while True:
message = await websocket.recv()
await aioconsole.aprint(message)
async def sent_message_handler(websocket):
while True:
message = await aioconsole.ainput()
await websocket.send(message)
async def main():
    uri = "ws://localhost:8765"
    print("You can now chat with other people in the room!")
async with websockets.connect(uri) as websocket:
    await asyncio.gather(
        received_message_handler(websocket),
        sent_message_handler(websocket)
    )
asyncio.get_event_loop().run_until_complete(main())
asyncio.get_event_loop.run_forever()
asyncio.get_event_loop().run_until_complete(main())
asyncio.get_event_loop.run_forever()
You can try the server and the client together by running them on different terminals. First, open a terminal and run python3 chat_server.py. Then, open two more terminals and run python3 chat_client.py. You’ll be able to send messages between them and have them displayed with their usernames.
Conclusion
Now, you know how to create a simple WebSocket chat server and a WebSocket client to interact with that server. A WebSocket server is very similar to a regular HTTP server, with the major difference being its ability to push messages to connected users. In this tutorial, the server was triggered by users typing in the chat, but it could also use events like periodic ping messages.
WebSockets are one of the best tools for creating applications that require bidirectional, real-time communication between the client and the server. This includes chat applications, real-time social media updates, voice bots, and real-time assistance, and more.
Scaling a WebSocket server to handle numerous simultaneous connections and high throughput can be challenging, but strategies such as load balancing, horizontal scaling, efficient resource management, and leveraging cloud solutions can help manage these challenges effectively.
Security is paramount when implementing WebSocket servers. Best practices include robust authentication and authorization mechanisms, encryption, rate limiting, input validation, and regular security audits to ensure the server remains secure and reliable.
The Python `websockets` library makes it extremely easy to create WebSocket servers. Its integration with Django allows you to add WebSocket capabilities to your web projects seamlessly, enhancing their functionality and user experience without breaking a sweat.
By following these guidelines and leveraging modern technologies, you can build robust, scalable, and secure WebSocket applications tailored to your specific needs.