
Symbl.ai is a Conversation Intelligence API platform for developers to augment the speaking realities of conversations in real-time. Many of the realities that speakers face in conversations are limited by the current state of the art for voice, video, message or broadcast platforms whose native functionality does not extend beyond enabling calls, streams, chats, or live events. Symbl.ai enables developers developing on any of the many streaming platforms to extend the functionalities of those platforms vastly through the introduction of no more than a few API calls.
Among the API calls with which you as a developer are empowered to extend the functionality of your calls is Symbl.ai’s Async API. With Symbl.ai’s Async API you have the power to augment the speaking realities of your speakers by separating their voices. With separated speakers you are able to connect, transform or visualize the aspects of a conversation that are unique to the separated speaker.
Symbl.ai’s Python SDK provides convenience methods for making calls to API endpoints like the one uploading a recorded call for processing with the Async API. In the following guide you will upload a recorded call with Symbl.ai’s Async API with the API call configured to enable speaker separation but with Symbl.ai’s Python SDK.
Sign up
Register for an account at Symbl.ai(i.e., https://platform.symbl.ai/). Grab both your appId and your appSecret. With both of those you should authenticate either with a cURL command or with Postman so that you receive your x-api-key. Here is an example with cURL:
curl --insecure --request POST "https://api.symbl.ai/oauth2/token:generate"
--header "accept: application/json"
--header "Content-Type: application/json"
--data "{ \"type\": \"application\", \"appId\": \"<appId>\", \"appSecret\": \"<appSecret>\"}"
Ideally a token server would handle authentication (with code that makes RESTful API call for generating token) so that neither the appSecret nor the appId were ever exposed. However, cURL sets you up immediately anyway. With thex-api-key handy you are now ready to establish a WebSocket endpoint for performing live transcription.
Setting Up Symbl.ai’s Python SDK
Symbl.ai’s Python SDK is a specially designed SDK for enable Pythonistas to program brand new experiences around conversations. In that respect Symbl.ai’s Python SDK empowers developers to access programmable intelligence directly in your mobile or web applications, client or server.
Installation
Before you install the Symbl.ai Python SDK, please ensure that you have installed Python 2.7+ or Python 3.4+ (PyPy supported). Symbl.ai recommends you execute Python’s installation through Homebrew, the open source package manager for MacOS.
Homebrew
To install Homebrew, open Terminal or your favorite OS X terminal emulator and run:
$ /bin/bash -c "$(curl -fsSL https://raw.githubusercontent.com/Homebrew/install/master/install.sh)"
After installing Homebrew, run the following command:
brew install pythonAfter the installation, check to see whether your version of Python is compatible with Symbl.ai’s installation requirements:
python --versionIf the version is higher than Python 2.7+ or Python 3.4+, then you’re all set to download Symbl.ai’s Python SDK.
Installing Symbl.ai’s Python SDK
Now that Python is installed, the next step is to install Symbl.ai’s Python SDK. To install Symbl.ai’s Python SDK, you install pip in the following way:
pip install --upgrade symblIn a similar way, you install the same:
python -m pip install --upgrade symblConfiguration
In a testing environment like the one you create to transform your conversation into a time series graph, you run credentials in-line. Since you quickly test the current code, you can utilize the credentials variable to pass your appId and appSecret as a part of the code itself. However, you must add the credentials variable every time make a new API call.
import symbllocal_path = r'c:/Users/john/Downloads/business_meeting.mp3'# Process audio fileconversation_object = symbl.Audio.process_file( file_path=local_path credentials={app_id: <app_id>, app_secret: <app_secret>}, #This is optional if you didn't setup the symbl.conf file in your home directory. )Making a Call to the Async API with the Python SDK
To start the process of hacking your conversations with Symbl.ai’s Python SDK you import the Symbl SDK.
import symblThe next step is to configure a payload in much the same way that you would configure a payload for an ordinary HTTP request in any one of your favorite programming languages. Here is a payload.
payload = {'url':'https://symbltestdata.s3.us-east-2.amazonaws.com/sample_audio_file.wav',}After configuring the payload, create a dictionary for storing credentials in the following way:
credentials_dict = {'app_id': '<app_id>', 'app_secret': '<app_secret>'}Last but not least create a conversation object. After the conversation object is created, the next step is to pipe the response selectively into the data you want to visualize in particular. The conversation object is a call to Symbl.ai’s Async API for processing audio through a URL.
conversation = symbl.Audio.process_url(payload=payload, credentials=credentials_dict)Parameters for Speaker Separation
To configure the conversation payload to deliver parameters directing the Async API to enable both a count as well as a separation of speakers, you configure a parameters dictionary with key-value pairs like so:
Note: If you made the call without specifying the number of speakers, you might have received the following message:
{"message":"diarizationSpeakerCount must be greater than zero and needs to be passed to accurately determine unique speakers in the audio"}To properly configure the conversation payload, you have to enable both a count as well as a separation of speakers in the following way:
parameters={'enableSpeakerDiarization': True, 'diarizationSpeakerCount': 2}Separate Speakers
By adding the following to your conversation payload, your proper configuration directs the Async API to both count as well as separate the speakers in the recorded call. With the proper configuration set up in your conversation payload, make your API call. After the API call is made, you receive a conversationId with which to check whether or not or how the numbered speakers were separated.
Conversation API’s Message API
After separating the speakers, number speaker labels appears within the messages of the Conversation API’s Message API’s return data. The data looks like the following:
{ "messages": [ { "id": "5543101041999872", "text": "But what?", "from": { "id": "f0fe6722-49c7-47c4-9708-03e4e5182508", "name": "Speaker 2" }, "startTime": "2021-08-16T19:38:01.747Z", "endTime": "2021-08-16T19:38:02.147Z", "conversationId": "0000-0000-0000-0000", "phrases": [] }]Numpy, Matplotlib, Pandas
Built on top of Numpy (i.e., multi-dimensional array objects) together with Matplotlib (i.e., capabilities for data visualizations), Pandas is a Python library for DataFrames, a programmatic object for two-dimensional, size-mutable, potentially heterogeneous tabular data (i.e., rectangular or tabular data of rows & columns or DataFrames). Pandas handle CRUD operations within those objects at the same time that they provide access to statistical analysis. With more than 14 million downloads a month, Pandas is the key that releases the genies in the bottles of Data Science throughout the world.
Before passing back to the analysis, there are two sets of important key words to mention about Pandas. 1) The three components are accessible through attributes: .values — data values in a two dimension numpy array, .columns, and .index — data values in row numbers or row labels. In addition to these attributes, there are display methods. These are .head() — displays the first row, .info() — display the names of columns, and .shape() — number of rows & columns (attribute, not method, no ()).
One other convenience method called .describe() is used for calculating some statistical data like percentile, mean and std of the numerical values of a Series or a DataFrame. It analyzes both numeric and object series and also the DataFrame column sets of mixed data types.
Creating Separate Numpy Arrays for Analyzing the Speakers Separately
The next step is to loop through the speaker separated transcription with the conversationIdto create separate Numpy arrays for analyzing the speakers separately. Since Symbl.ai provides timestamped, speaker separated data from the Message API within the Conversation API’s suite of API endpoints, your first step now is to perform an analysis of sentiments on your speaker separated timestamped data.
Message API & Sentiment Analysis
Symbl.ai’s Python SDK makes the process of performing an analysis of sentiments on your speaker separated timestamped data convenient. You make a call to more than a single API endpoint with a payload. The payload is a dictionary just like the one for speaker separation, except with a new key-value pair: parameters={‘sentiment’: True}.
response = conversation.get_messages(parameters={'sentiment': True})After making the call to the conversation API through the .get_messagesconvenience method on the Conversation API’s Message API, you receive a JSON return data in the following format:
{ "messages": [ { "id": "5543101041999872", "text": "But what?", "from": { "id": "f0fe6722-49c7-47c4-9708-03e4e5182508", "name": "Speaker 2" }, "startTime": "2021-08-16T19:38:01.747Z", "endTime": "2021-08-16T19:38:02.147Z", "conversationId": "0000-0000-0000-0000", "phrases": [], "sentiment": { "polarity": { "score": -0.301 }, "suggested": "negative" } }]Loading the Numpy Arrays
The first step is to empty initialize a set of arrays.
timestamps1, timestamps2, polarities1, polarities2 = [], [], [], []After having empty initialized these two empty arrays, your next step is to loop through the Message API’s return data to map both the timestamps as well as the sentiments correctly to the speaker separated arrays.
As you may imagine, 1) your first step is to fetch the JSON data from the conversation payload. 2) Your second step is to create a Python if/else statement where the first condition is whether or not the speaker is speaker 1 while the second condition is whether or not the speaker is speaker 2. Based on which speaker is which, you configure the Python flow logic to map the speaker separated timestamps to the Numpy array, the speaker separated timestamps to the Numpy array.
timestamps1, timestamps2, polarities1, polarities2 = [], [], [], [] for message in response.messages: if message.from.name == "speaker 1": timestamps1.append(message.start_time) polarities1.append(message.sentiment.polarity.score) elif message.from.name == "speaker 2": timestamps2.append(message.start_time) polarities2.append(message.sentiment.polarity.score) print(timestamps1, timestamps2) print(polarities1, polarities2)Creating Speaker Separated DataFrames with Pandas
The next step is to merely map the Numpy arrays directly to Pandas’ DataFrames in the following way:
import pandas as pd df1 = pd.DataFrame({"timestamps": timestamps1,"polarities": polarities1}) df2 = pd.DataFrame({"timestamps": timestamps2,"polarities": polarities2})Plotting Multiple DataFrames with Matplotlib to a Single Plot: pandas.DataFrame.plot()
To perform a simultaneous timeseries analysis of the timestamped, speaker separated data from the Message API, you load the DataFrames directly into a .plot call on Matplotlib, configuring the x-axis to display the timestamps, the y-axis to display the polarities.
You might think that the logical code implementation for that type of configuration is to run both DataFrames through the same method call.
df1.plot(x="timestamps", y="polarities") df2.plot(x="timestamps", y="polarities")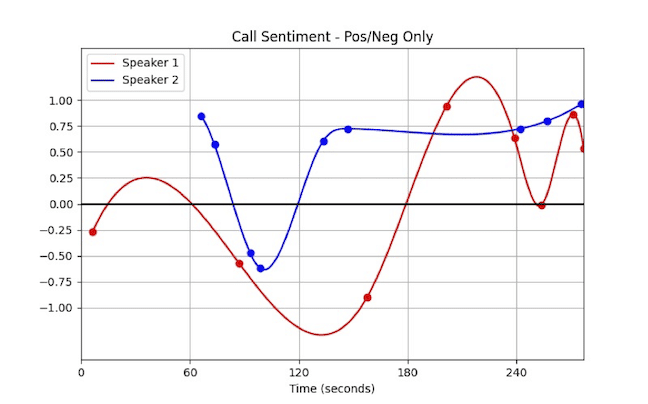
You might think that the logical code implementation for that type of configuration is to run both DataFrames through the same method call.
The logical code implementation, however, is quite different in Pandas. You make the assignment of one DataFrame’s plot equivalent to the other in the following way:
ax = df1.plot() df2.plot(ax=ax)What’s Next
In addition to adding bells and whistles to your graphs like labels, you may consider how Symbl.ai’s Python SDK provides access to many of Symbl.ai’s APIs. In particular, you can enable Symbl.ai’s Python SDK on the real-time Telephony API (i.e., Telephony API (in Real-time) or any one of the Async APIs for voice, video, or messaging. A complete list is here:
In addition, Symbl.ai’s Python SDK contains links to enable Symbl.ai on its Telephony APIs with Python special methods. The methods for dialing into a call, work on the Session Initiation Protocol (SIP). With Symbl.ai’s Python SDK dialed into a call, your in a position to expand the experiences around calls in real-time. After connecting to a SIP call in real-time, you subscribe to Symbl.ai’s events such as events for contextual insights like follow-ups, questions, or action-items, or you create a request to deliver a post-meeting summary directly to your inbox.
Community
Symbl.ai‘s invites developers to reach out to us via email at [email protected], join our Slack channels, participate in our hackathons, fork our Postman public workspace, or git clone our repos at Symbl.ai’s GitHub.