Behind Artificial Intelligence/Machine Learning as the bleeding edge of the algorithmic revolution is automation. Automation is accelerating the rate of change in technology across industries around the world. The ability to interpret data to program reactive transformations in real-time from one state to another without a human hand is one of the most powerful ways to advance technology.
Pipedream
In pursuit of that goal is Pipedream. Pipedream is a serverless, real-time API platform for programmatically transforming data from one state to another without a human hand. It provides multiple points of entry for Third Party Software as a Service to enable developers to connect APIs remarkably fast with triggers or actions in Node.js. With managed authentication for 300+ OAuth or key-based APIs, Pipedream makes environment variables accessible for credentials or references in any workflow. It is serverless so the platform does not require developers to deploy their automation engines to the cloud.
Since Pipedream works with any or all APIs, Pipedream’s platform automates the process of connecting Telnyx PSTN calls seamlessly. Symbl.ai is already enabled Pipedream. Pipedream therefore empowers developers to combine Symbl.ai’s Conversation Intelligence API platform with Telnyx to create powerful automations that save time, money, or effort throughout the entire process of a call.
In your automation you program Pipedream to enable call recording through the interpretation of a WebHook’s response data. After automating the recording, you enable Symbl.ai to process the recorded call upon completion. You literally daisy chain the three together, Telnyx, Pipedream, Symbl.ai.
Prerequisites
Pipedream Account
Telnyx Account
Symbl.ai Account
cURL
Telnyx
Telnyx is a real-time communications platform with full, feature-rich voice functionalities, making it quick and easy to set up and port numbers around the world, configure messaging, control VoIP and IP network functions, and define how and where communications can be used in real time. The Telnyx API can power a host of specialty applications, from call tracking to cloud-based PBX, dynamic security, and authentication use cases.
Telnyx’s Voice APIs provide you as a developer with access to recorded calls through a single API call.
Steps
To analyze a recorded call with Telnyx, you set up your Voice API configuration with Telnyx’s Call Control within the Telnyx Portal. Just follow these simple steps:
- Sign up for a Telnyx account.
- Create an application to configure how you connect your calls.
- Buy or port a phone number to receive inbound calls, and assign this number to your new application.
- Create an outbound voice profile to make outbound calls, and assign your application to this new profile.
- Record the call
- Generate a Public URL for recorded calls
These steps are summarized on Telnyx’s quickstart guide.
Portal Signup
Let’s begin with the easiest step of all. Head to the signup page to sign up for your free Telnyx account. It’ll give you access to our Mission Control Portal, where you can buy numbers, set up and manage connections and a lot more. The first step is to search and purchase a Telnyx Voice API number.
Search and Purchase
After clinking on numbers, you are provided with the ability to search and buy a number:
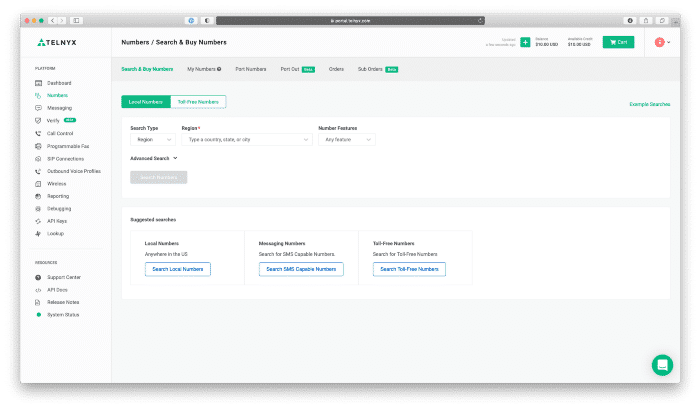
After selecting a number, checkout.
Editing your Call Control App
After selecting a number, you navigate to the Call Control App.
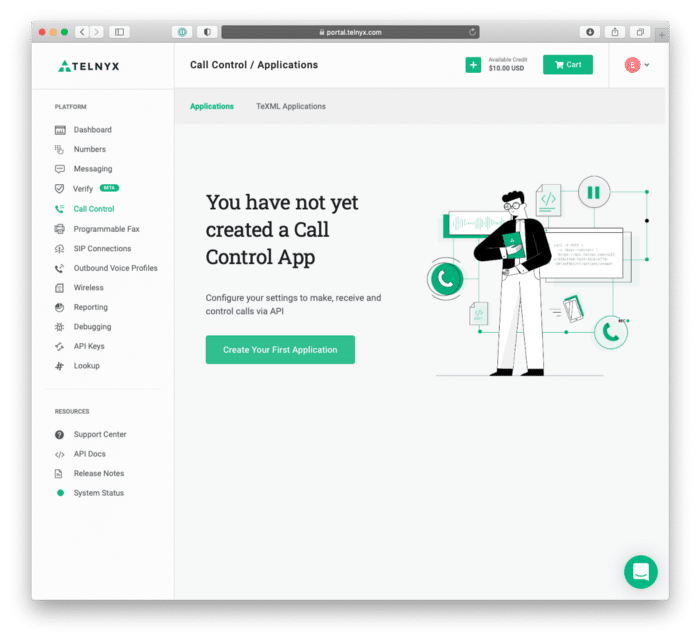
After clicking “Create Your First Application”, you edit your Call Control App.
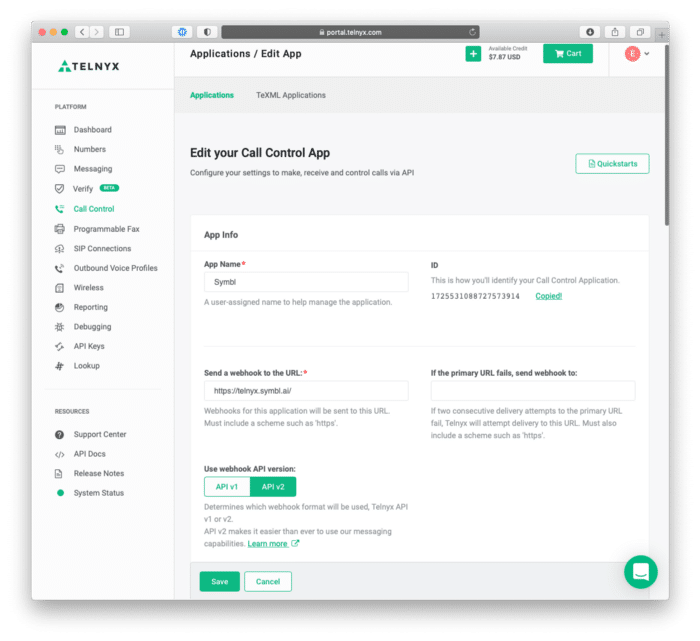
There are three steps to take in editing the Call Control App:
- Create an App Name.
- Copy of the Call Control Application number as later the number is used in a cURL command as a uuid.
- Paste the link you called your “Your unique URL.”
With those three steps out of the way, your Call Control App is ready to enable outbound calls through POST requests with cURL commands.
The First cURL Request
To initiate a Telnyx Voice API call for recording, you make the following POST request:
curl -X POST --header "Content-Type: application/json" --header "Accept: application/json" --header "Authorization: Bearer YOUR_API_KEY" --data '{"connection_id": "UUID", "to": "YOUR TELEPHONE NUMBER", "from": "YOUR TELNYX VOICE API NUMBER"}' https://api.telnyx.com/v2/callsAs you can see above, you will need to change the variables for the following:
- YOUR_API_KEY
- YOUR_TELEPHONE_NUMBER
- YOUR_TELNYX_VOICE_API_NUMBER
- UUID
The UUID is the Call Control Application number from number 2 in the section above.
After the request successfully POSTs, the webhook server returns a POST request with return data like so:
{ "data": { "event_type": "call.initiated", "id": "3d4d3f3a-cfd6-437e-9592-7554a9996a45", "occurred_at": "2021-09-14T18:52:40.155477Z", "payload": { "call_control_id": "ef8ffc44-158c-11ec-8de2-02420a0d4168", "call_leg_id": "ef8ffc44-158c-11ec-8de2-02420a0d4168", "call_session_id": "ef8ab3d8-158c-11ec-b771-02420a0d4168", "client_state": null, "connection_id": "1725531088727573914", "direction": "outgoing", "from": "+16182216200", "state": "bridging", "to": "+19168739475" }, "record_type": "event" }, "meta": { "attempt": 1, "delivered_to": "https://YOURPIPEDREAMWEBHOOK.pipedream.net" } }The Second cURL Request
To initiate the recording for Telnyx’s Voice API call, you execute the following POST request withcURL:
curl -X POST --header "Content-Type: application/json" --header "Accept: application/json" --header "Authorization: Bearer YOUR_API_KEY" --data '{"format": "mp3", "channels": "single"}' https://api.telnyx.com/v2/calls/{call_control_id}/actions/record_startAs you can see above, you will need to change the variables for the following:
- YOUR_API_KEY
- call_control_id
The call_control_id comes directly from the return data from the last POST request.
After the request successfully POSTs, the terminal returns the following data:
{ "data": { "record_type": "recording", "recording_id": "c84048c4-e4cd-48f6-a94e-cf8be3fbd884", "result": "ok" }The next step is to hang up the call. With the call hung up, the webhook server serves the public URL for accessing the recorded call.
Public URLs for Recorded Calls
After recording a call with Telnyx’s Voice API, you make a call with one of the call commands to expose the webhook for the public recording URL (e.g., public_recording_urls) in the call.recording.saved object.
After successfully making the call, the return data POSTs to the webhook server. Within the return data for the JSON, the recording_urls looks like the following before it is posted to the web hook:
{ "data": { "event_type": "call.recording.saved", "id": "0ccc7b54-4df3-4bca-a65a-3da1ecc777f0", "occurred_at": "2018-02-02T22:25:27.521992Z", "payload": { "call_leg_id": "428c31b6-7af4-4bcb-b7f5-5013ef9657c1", "call_session_id": "428c31b6-abf3-3bc1-b7f4-5013ef9657c1", "channels": "single", "client_state": "aGF2ZSBhIG5pY2UgZGF5ID1d", "connection_id": "7267xxxxxxxxxxxxxx", "public_recording_urls": { "mp3": "http://example.com/recording.mp3", "wav": "http://example.com/recording.wav" }, "recording_ended_at": "2018-02-02T22:25:27.521992Z", "recording_started_at": "2018-02-02T22:20:27.521992Z", "recording_urls": { "mp3": "http://example.com/recording.mp3", "wav": "http://example.com/recording.wav" } }, "record_type": "event" } }After posting to the webhook, the recording_urls looks like the following before it is posted to the web hook:
{ "data": { "event_type": "call.recording.saved", "id": "47ee6238-6c0d-4f49-bd46-b2b00ea42fbd", "occurred_at": "2021-09-14T18:54:58.177200Z", "payload": { "call_control_id": "ef8ffc44-158c-11ec-8de2-02420a0d4168", "call_leg_id": "ef8ffc44-158c-11ec-8de2-02420a0d4168", "call_session_id": "ef8ab3d8-158c-11ec-b771-02420a0d4168", "channels": "single", "client_state": null, "connection_id": "1725531088727573914", "end_time": "2021-09-14T18:54:57.517467Z", "format": "mp3", "public_recording_urls": {}, "recording_ended_at": "2021-09-14T18:54:57.517467Z", "recording_id": "c84048c4-e4cd-48f6-a94e-cf8be3fbd884", "recording_started_at": "2021-09-14T18:54:38.008036Z", "recording_urls": { "mp3": "https://s3.amazonaws.com/telephony-recorder-prod/b880fcdb-d93b-46e9-9c62-2aa7c5b2eb06/2021-09-14/ef8ffc44-158c-11ec-8de2-02420a0d4168-1631645677.mp3?X-Amz-Algorithm=AWS4-HMAC-SHA256&X-Amz-Credential=AKIASDC5E2MJDPKMH7UW%2F20210914%2Fus-east-1%2Fs3%2Faws4_request&X-Amz-Date=20210914T185458Z&X-Amz-Expires=600&X-Amz-SignedHeaders=host&X-Amz-Signature=b586b5ed26263edb7fd13c7b227c094e4ee9dd45403278d6f9335ee034c4d65d" }, "start_time": "2021-09-14T18:54:38.008036Z" }, "record_type": "event" }, "meta": { "attempt": 1, "delivered_to": "https://YOURPIPEDREAMWEBHOOK.pipedream.net" } }Symbl.ai requires nothing more than that URL to handle analyzing the Telnyx recorded call. The great thing about Telnyx is that Telnyx empowers developers to provide options with which to determine the file type of the recorded call hosted on the S3 bucket. In recording_urls above the file type is .mp3. Symbl.ai’s Conversation Intelligence API platform accepts .mp3 files right out of the box.
Pipedream
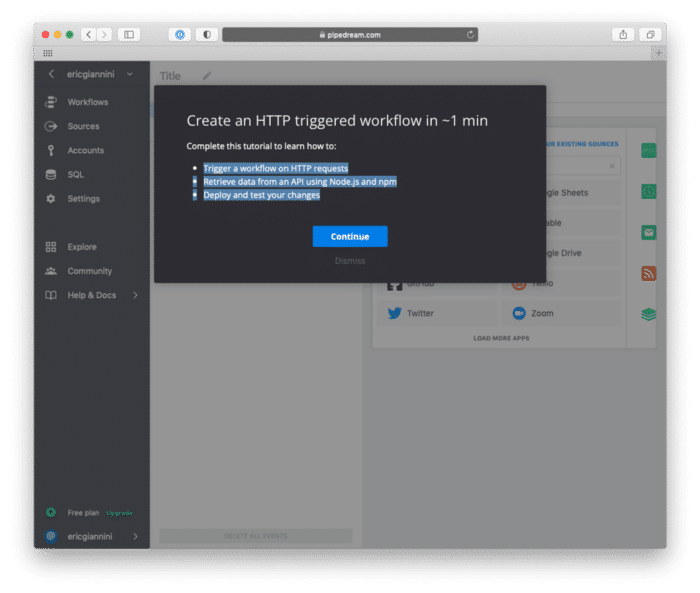
Pipedream is one of the most developer friendly platforms for automations. It greets developers with a special onboarding immediately upon login. In Pipedream’s special onboarding, Pipedream teaches you how to create an HTTP triggered workflow where you 1) trigger a workflow on an HTTP request, 2) retrieve data from an API using Node.js with npm, 3) deploy your changes for testing.
Automation Process for Pipedream with Telnyx
Pipedream initiates its automation after the enabled WebHook server returns the response data from the final POST request in the chain of POST requests made to create a recorded call. The chain is 1) v2/calls, 2) v2/calls/{call_control_id}/actions/record_start where the response data to the latter call is an .mp3 file hosted by AWS from the section on recording_urls. You access that data from the data pipeline in the following way: event.body.data.recording_urls. Accordingly, the process by which you automate the analysis of recorded call is a multi-step process so after you have automated the call recording, the next step is to create another automation for transferring the recorded call to Symbl.ai for processing.
Automating Telnyx Call Recording with Symbl.ai within Pipedream
After familiarizing yourself with Pipedream, the next step is to create a workflow. A workflow is a set of steps designed to respond to events over a webhook. In your workflow for automating call recording, you configure two steps, one for a trigger, another for processing.
Environment Variables
However, before creating a workflow, you need to configure your environment variables appropriately. Navigate to Settings > Environment Variables > New Environment Variable. For YOUR_ENV_VAR_NAME, set the name as TELNYX_API_KEY, add the value. After adding the value, the next step is to add your Symbl.ai appId and appSecret with their respective values for each.
The Event Flow
Pipedream is a reactive platform that reacts to events in real-time. Telnyx, in the same regard, is reactive, an event driven architecture where every action creates an opposite and equal reaction. In that reactive system, Telnyx creates events when a call is initiated (i.e., call.initiated), hung up (i.e., call.hangup), answered (i.e., call.answered), or recorded (i.e., call.recording.saved) for each of which Telnyx issues a POST request on its webhook. The request / response model, common among all APIs of the world, is a basic HTTP framework in motion.
Pipedream WebHook
Here is where both Pipedream as well as Telnyx are exceptionally developer friendly. Pipedream creates a link for a webhook whereas Telnyx receives the created links for webhooks. One fits into the other like as in the two go together like hand and glove. The next step is to take your Pipedream webhook so that you can add it to Telnyx.
- Login into the Telnyx platform
- Navigate from the Dashboard to Call Control / Applications
- Select your number.
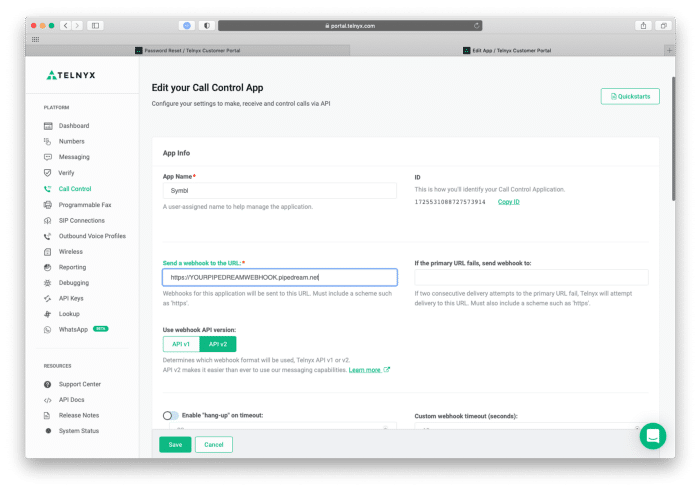
- Navigate from Edit your Call Control App > Send a webhook to the URL.
- Paste your Pipedream webhook url: “delivered_to”: “https://YOURPIPEDREAMWEBHOOK.pipedream.net“
After you have added your Pipedream WebHook url, close the Telnyx account. With the WebHook set up in the Telnyx platform, the next step is to create the workflow for responding to the events the Telnyx APIs POST to the Pipedream WebHook.
Your Pipedream Webhook in Telnyx’s Call Control App
Steps for Trigger
The first step is to set up a trigger. A trigger in the Pipedream platform is a step in the portal where the events posted to the webhook are handled. The workflow triggers the workflow on each request. The advantage that Pipedream provides is that the platform’s triggers not only handle the event, they handle the event’s JSON return data, parsing it entirely upon receipt. In terms of Telnyx, the webhook therefore parses the return data for the Telnyx events mentioned earlier: (i.e., call.initiated), hung up (i.e., call.hangup), answered (i.e., call.answered), or recorded (i.e., call.recording.saved).
Triggering
Pipedream’s own developer onborading teaches you how to properly configure an HTTP API as a trigger. Pipedream generates a unique URL to trigger :(i.e., your https://YOURPIPEDREAMWEBHOOK.pipedream.net). Since Pipedream automatically detects the JSON schema of the HTTP API’s return data, Pipedream provides developers with a readily made solution for enabling developers to gain access to the data contained in the step: steps.trigger.event. Consequently, you access the return data from that single instance (i.e., .event).
Processing with Node.js
In the next step, which is a sandbox for Node.js, Pipedream feeds the events or steps into a large async call (i.e., an invention of genius for its simplicity). In the async step, the Node.js app completes the calls to functions for handling the different types of functions with which to program automatic reactions. The async function call looks like the following:
async (event, steps) => {}In the async call declare the following:
const axios = require('axios') const name = "Pipedream's Automation for Telnyx with Symbl.ai" const type = event.body.data.event_typeIn the next step you need to program the Telnyx events mentioned earlier: (i.e., call.initiated), hung up (i.e., call.hangup), answered (i.e., call.answered), or recorded (i.e., call.recording.saved) in the following way:
After you have identified the async function call, the next step is to program a type to toggle, as you toggle from one type of event to another. In the following, you toggle from one type of Telnyx event to another:
const type = event.body.data.event_type if (type === "call.recording.saved") { console.log("The Call is Saved") } else if (type === "call.answered") { console.log("The Call is Answered") const callControlId = event.body.data.payload.call_control_id const recordingInitiated = await startRecording(callControlId) console.log("The recording is initiated:", recordingInitiated) } else if (type === "call.initiated" || type === "call.hangup") { $end() } else { $end() }The code there is straight forward an if/else statement for toggling on different types of events. The next step is to program the reactions to be triggered in regards to different types of events. The first reaction is to trigger recording when the call is answered.
const startRecording = async (callControlId) => { const data = { format: 'mp3', channels: 'single' } try { const response = await axios({ method: 'POST', url: `https://api.telnyx.com/v2/calls/${callControlId}/actions/record_start`, headers: {Authorization: `Bearer ${process.env.TELNYX_API_KEY}`}, data: data }) return response.data } catch (error) { console.log(error) } }After a call is answered, the callControlId is returned. With the callControlId returned, the next step is to make a POST request to Telnyx’s API endpoint for recording calls: /actions/record_start. After the function for enabling call recording is configured, the next step is designed to save the call for processing.
if (type === "call.recording.saved") { // Save the url from the event for recording const url = event.body.data.payload.recording_urls.mp3 //Submit Job const token = await symblToken() const job = await pushAudioUrl(url, token) console.log(job) }The next step is to program the functions called to trigger both Symbl.ai’s authentication as well as its audio processing.
const symblToken = async () => { const data = { type: "application", appId: process.env.SYMBL_APPID, appSecret: process.env.SYMBL_SECRET } try { const response = await axios({ method: 'POST' , url: 'https://api.symbl.ai/oauth2/token:generate', headers: {'Content-Type': 'application/json'}, data: data }) return response.data.accessToken } catch (error) { console.log(error) } }The function symblToken() is an HTTP POST request that passes the appId and appSecret over to Symbl.a’s authentication API, returning a token.
The next function is an HTTP POST request to Symbl.ai’s audio processing API. API sends the url from event.body.data.payload.recording_urls.mp3 over to Symbl.ai for processing.
const pushAudioUrl = async (url, token) => { const data = { name: name, url: url, webhookUrl: 'https://YOURPIPEDREAMWEBHOOK.pipedream.net' } try { const response = await axios({ method: 'POST', url: 'https://api.symbl.ai/v1/process/audio/url', headers: { 'Content-Type': 'application/json', Authorization: `Bearer ${token}` }, data: data }) return response.data } catch (error) { console.log(error) } }Upon Completion
After the automation is complete, you receive both a conversationId as well as a jobId with which to check the results you have achieved through the automation.
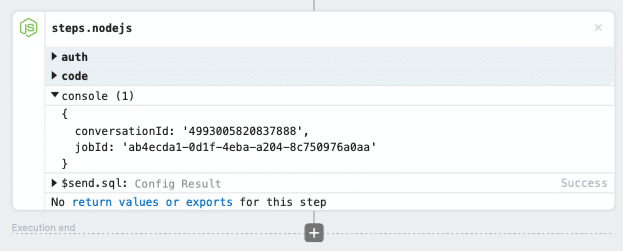
Pipedream’s Node.js with a conversationId & jobId
Community
Symbl.ai’s invites developers to reach out to us via email at [email protected], join our Slack channels, participate in our hackathons, fork our Postman public workspace, or git clone our repos at Symbl.ai’s GitHub.