Quick Navigation:
Relevant Resources:
Contextual AI: The Next Frontier of Artificial Intelligence
Summary
In this article, we will demonstrate how to seamlessly integrate the Zoom meeting platform with the Symbl.ai platform using their Custom Live Streaming over Real Time Messaging Protocol (RTMP). This integration allows you to push your RTMP stream from Zoom live meetings into Symbl.ai and obtain real-time transcripts, trackers, classifiers like topics, action items, follow-ups, and questions. By leveraging this integration, you can automate meeting notes and summarize conversations for purposes such as coaching, governance and compliance, and activating meeting assistance for follow-ups and scheduling next steps.
What is RTMP?
RTMP, or Real-Time Messaging Protocol, is a robust live streaming protocol that efficiently transmits audio, video, and data from an encoder to a server over the internet. RTMP maintains persistent connections, allowing low-latency communication. It dynamically fragments streams to optimize transmission, with default fragment sizes of 64 bytes for audio and 128 bytes for video and other data.
Why use Zoom live streaming with Symbl.ai?
More and more developers are shifting to develop their apps using the Zoom platform and are looking for adding intelligence beyond simple speech recognition. Symbl.ai enables you to add the best in class conversation intelligence technology that combines high quality transcripts along with pre-built and programmable insights, actions, sentiments, topics and more. . Symbl.ai is a developer platform that has different APIs and SDKs that lets you leverage the power of contextual understanding to understand and comprehend human to human conversations which are usually chaotic. This is where Symbl.ai technology is targeted for and is the perfect solution to unlock developers to capture conversations in real-time meaning you can analyze, gain instant feedback and pull insights during the call.
Integration Requirements:
Before starting, ensure you have the following:
- A Zoom developer account with API access: Zoom developer account
- Server-to-Server OAuth: These tokens provide enhanced security and easier management of API access without requiring user interaction. For detailed steps on setting this up, refer to the Zoom OAuth Integration Guide.
- A Zoom Meeting ID: This can be obtained from the Zoom meeting you wish to stream.
Necessary prerequisites for live streaming on Zoom:
Ensure you have the appropriate Zoom account level (Pro, Business, Education, or Enterprise) and an updated Zoom Desktop Client. Refer to the Zoom Live Streaming Requirements.
- Zoom Desktop Client
- Windows: version 4.0.29183.0407 or higher
- macOS: version 4.0.29208.0410 or higher
- A registered Symbl.ai account and a valid token to use Symbl.ai APIs: Sign Up for Symbl.ai
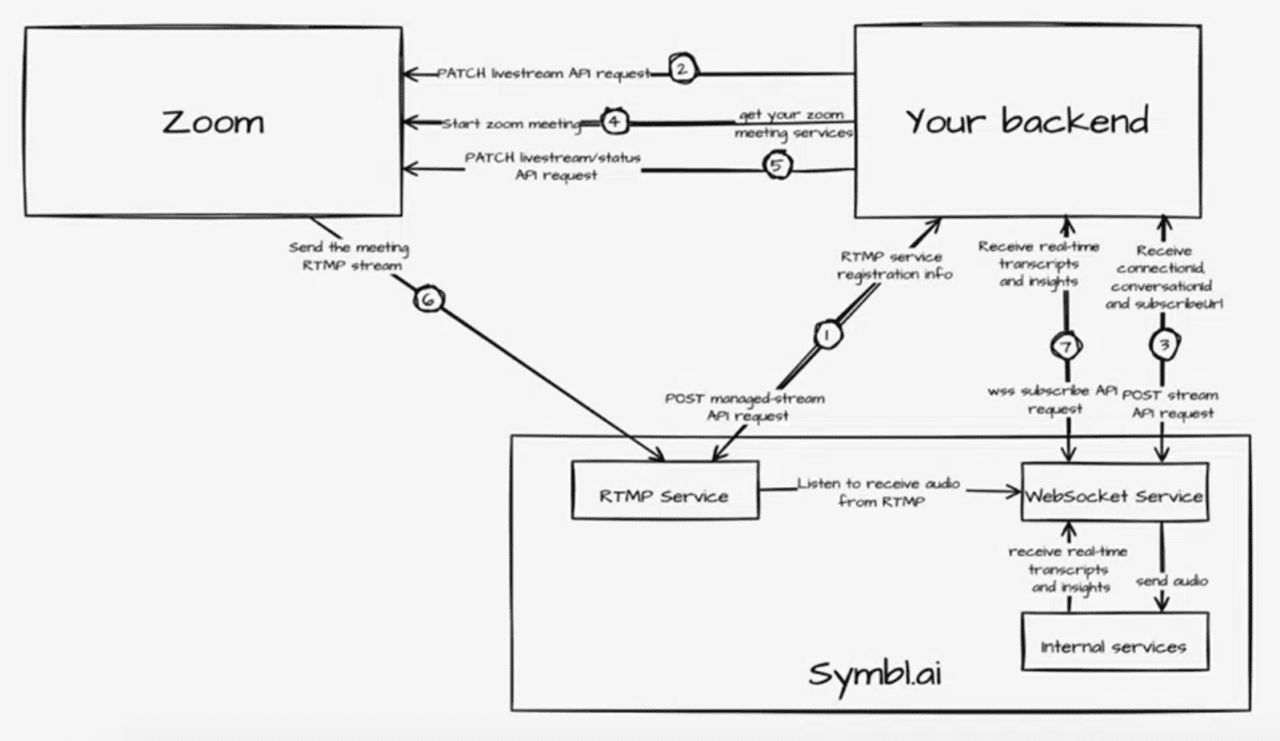
Integration Steps – Before Zoom meeting starts:
Integration Step #1: Symbl.ai Managed Stream API:
For custom live streaming option Zoom is using a Real-Time Messaging Protocol (RTMP) and requires a destination to Symbl.ai to pass this live stream. The managed-stream API is providing the RTMP stream destination information. The managed-stream API receives the “protocol” and “secure” values and returns a “streamId ” and “streamUrl ”. The returned “streamId” is used as the “secretKey” value and the “streamUrl” link (minus the streamId) as the stream URL value for the custom live streaming services to be registered as the destination for Zoom meeting RTMP stream.
Http Request
POST https://api.symbl.ai/v1/managed-stream
Request Header
| Parameter | Required | Value |
| x-api-key | Yes | <token> |
| Content-Type | Yes | application/json |
Body Params
| Parameter | Required | Value | Description |
| protocol | Yes | “rtmp” | Currently only support “rtmp” |
| secure | Yes | true | Value can be “true“ or “false“. “true“ value will provide a secure rtmps url and false will provide a non-secure rtmp url |
Node.js Example API call request
const fetch = require("node-fetch");
const body = {
    "protocol": "rtmp",
    "secure": true
};

fetch('https://streaming-test-494c9fed094f0e2a327349f66bb79d2a.symbl.ai/v1/managed-stream', {
        'method': 'post',
        'body': JSON.stringify(body),
        'headers': {
            'x-api-key' : “”,
            'Content-Type': 'application/json'
        }
    })
    .then(res => res.json())
    .then(json => console.log(json));
Example Output

Integration Step #2: Register Zoom meeting RTMP stream to Symbl.ai destination using livestream API:
Once you have Symbl.ai RTMP stream destination details from managed-stream API use these details to update the relevant Zoom meetingId prior to the meeting.
PATCH https://api.zoom.us/v2/meetings//livestream"
Request Header
| Parameter | Required | Value |
| authorization | Yes | Bearer <token> |
| Content-Type | Yes | application/json |
Body Params
| Parameter | Required | Value | Description |
| stream_url | Yes | streamUrl (minus the streamId) from managed-stream API response | steamUrl represents the RTMP server endpoint |
| stream_key | Yes | streamId from managed-stream API response | stream key to identify the RTMP connection |
| page_url | Yes | page URL of live streaming | This value can be an available endpoint of server that don’t really do live streaming |
Node.js Example API call request
let meetingId = "Zoom meetingId"
let stream_url = "steramUrl server endpoint from managed-stream API"
let stream_key = "steramId from managed-stream API"
let page_url = "Can be any server endpoint"
let zoom_oath_token = "Your Zoom auth token"

const fetch = require("node-fetch");
const body = {
	"stream_url": stream_url,
	"stream_key": stream_key,
	"page_url": page_url
};

fetch("https://api.zoom.us/v2/meetings/"+ meetingId + "/livestream", {
    	method: 'PATCH',
    	body:	JSON.stringify(body),
    	headers: {
        	'authorization': "Bearer " + zoom_oath_token,
        	'Content-Type': 'application/json'
    	}
	})
	.then(response => response.text())
	.then(result => console.log(result))
	.catch(error => console.log('error', error));
Example Output- Empty response of 204

Integration Step #3: Stream API – Start request (Pre-Alpha feature):
Once a meeting is about to start or started, use the stream API for Symbl to start listening to the RTMP stream. The stream API receives “operation” and “streamId” and “enableSubscription” values and returns “connectionId”, “conversationId” and “subscriptionUrl”. You can connect to Symbl’s WebSocket API with the “subscriptionUrl ” (Explained in next integration step) and get the live conversation real-time transcripts, messages, topic and insights.
Important note: The enableSubscription is set true by default and is used for the customer to connect and get the WebSocket stream response as a listener.
Http Request
POST https://streaming-test-494c9fed094f0e2a327349f66bb79d2a.symbl.ai/v1/stream
Request Header
| Parameter | Required | Value |
| x-api-key | Yes | <token> |
| Content-Type | Yes | application/json |
Body Params
| Parameter | Required | Value | Description |
| operation | Yes | “start“ | “start” value will open a WebSocket connection to Symbl for the RTMP stream |
| streamId | Yes | streamId value received from managed-stream API | streamId value received from managed-stream API |
| enableSubscription | No | true or false | “true“ is set as default and is used for the customer to connect and get the WebSocket stream response as a listener. |
Node.js Example API call request
const fetch = require("node-fetch");
const body = {
	"operation": "start",
	"streamId": "",
	"enableSubscription": true
};

fetch('https://streaming-test-494c9fed094f0e2a327349f66bb79d2a.symbl.ai/v1/stream', {
    	method: 'post',
    	body:	JSON.stringify(body),
    	headers: {
      	  'x-api-key' : “”,
        	'Content-Type': 'application/json'
    	}
	})
	.then(res => res.json())
	.then(json => console.log(json));
Example API call JSON response
{
  conversationId: '6578362749288448',
  connectionId: 'd0126ecc-a164-4250-962d-aab2478e7f32',
  subscriptionUrl:'wss://api.symbl.ai/v1/subscribe/771a8757-eff8-4b6c-97cd-64132a7bfc6e'
}
Example output showing conversationID, connectionID, and subscriptionURL

Integration Step #4 – Subscribe to Symbl connection using Subscribe API
Once the subscriptionUrl is returned, the user can connect via WebSocket. Once the connection is established the WebSocket connection will stream live transcripts, messages, topics, and insights in real-time which you can use in your app.
Important note: In case you are not interested in getting live transcripts and insights you can skip this step. At the end of the meeting all the data analysis will be available using the unique identifier conversationId you got in “Integration Step #3” with Symbl’s Conversation APIs.
The structure of the above data being sent in real-time will be exactly the same as received via the WebSocket API.
If the subscriptionUrl is invalid or does not exist, then the API will accept the WebSocket connection and return a 404 error code with a message intimating that the subscriptionUrl doesn’t exist for any on-going calls.
Node.js Example of Subscribe to Symbl connection using WebSocket Client
npm install ws[b]  (in terminal)

const WebSocket = require('ws');
 const accessToken =  ''
 const subscriptionUrl = ''
 const symblEndpoint = `${subscriptionUrl}?access_token=${accessToken}`;
 const ws = new WebSocket(symblEndpoint);

 // Fired when a message is received from the WebSocket server

 ws.onmessage = (event) => {
   // You can find the conversationId in event.message.data.conversationId;
   const data = JSON.parse(event.data);
   if (data.type === 'message' && data.message.hasOwnProperty('data')) {
     console.log('conversationId', data.message.data.conversationId);
   }
   if (data.type === 'message_response') {
     for (let message of data.messages) {
       console.log('Transcript (more accurate): ', message.payload.content);
     }
   }
   if (data.type === 'topic_response') {
     for (let topic of data.topics) {
       console.log('Topic detected: ', topic.phrases)
     }
   }
   if (data.type === 'insight_response') {
     for (let insight of data.insights) {
       console.log('Insight detected: ', insight.payload.content);
     }
   }
   if (data.type === 'message' && data.message.hasOwnProperty('punctuated')) {
     console.log('Live transcript (less accurate): ', data.message.punctuated.transcript)
   }
   console.log(`Response type: ${data.type}. Object: `, data);

 };

 // Fired when the WebSocket closes unexpectedly due to an error or lost connection

 ws.onerror  = (err) => {
   console.error(err);

 };

 // Fired when the WebSocket connection has been closed

 ws.onclose = (event) => {
   console.info('Connection to websocket closed');
 };
Integration Step #5 – Start Zoom live streaming in your Meeting to get Real-Time Transcripts and Insights:
Once you identify the Zoom meeting has started, start the live streaming using Zoom livestream/status API and you will start seeing real-time transcripts and insights generated from Subscribe API
PATCH https://api.zoom.us/v2/meetings//livestream/status"
Request Header
| Parameter | Required | Value |
| x-api-key | Yes | Bearer <token> |
| Content-Type | Yes | application/json |
Body Params
| Parameter | Required | Value | Description |
| action | Yes | “start“ | start or stop the streaming process in a Zoom meeting |
| settings | Yes | In setting dictionary add “active_speaker_name”: false “display_name”: |
display the streaming service name |
Node.js Example API call request
let meetingId = "Zoom meetingId"
let zoom_oath_token = "Your Zoom auth token"
let display_name = "Your company or service name you would like to display"
let action = "start"

const fetch = require("node-fetch");
const body = {
	"action": action,
	"settings": {
  	"active_speaker_name": false,
  	"display_name": display_name
	}
};

fetch("https://api.zoom.us/v2/meetings/"+ meetingId + "/livestream/status", {
    	method: 'PATCH',
    	body:	JSON.stringify(body),
    	headers: {
        	'authorization': "Bearer " + zoom_oath_token,
        	'Content-Type': 'application/json'
    	}
	})
	.then(response => response.text())
	.then(result => console.log(result))
	.catch(error => console.log('error', error));
Example API call JSON response – Empty response of 204
Example output showing live streaming started successfully.
{}

Integration Steps – Meeting is completed. What to do? Stop the streaming service
Step #1: Stream API – Stop request (Pre-Alpha feature):
Once the Zoom RTMP streaming is done in order to stop stream API service, send a stop value in operation and the RTMP streamId, to close Symbl connection so it will stop listening to the RTMP stream.
POST https://streaming-test-494c9fed094f0e2a327349f66bb79d2a.symbl.ai/v1/stream
Request Header
| Parameter | Required | Value |
| x-api-key | Yes | <token> |
| Content-Type | Yes | application/json |
Body Params
| Parameter | Required | Value | Description |
| protocol | Yes | “stop“ | “stop” value will close the WebSocket connection of Symbl for the RTMP stream |
| streamId | Yes | streamId value | streamId value |
Node.js Example API call request
const fetch = require("node-fetch");
const body = {
	"operation": "stop",
	"streamId": "",
};

fetch('https://streaming-test-494c9fed094f0e2a327349f66bb79d2a.symbl.ai/v1/stream', {
    	method: 'post',
    	body:	JSON.stringify(body),
    	headers: {
        	  'x-api-key' : “”,
        	'Content-Type': 'application/json'
    	}
	})
	.then(res => res.json())
	.then(json => console.log(json));
.catch(error => console.error('Error:', error));
Example API call JSON response
{ message: "Stream stopped successfully." }

Step #2: End the Zoom meeting
Customer will end the Zoom meeting.
Integration – Speaker Separation (Optional) – Post Meeting
If you would also like to have speaker separation in your Symbl conversation analysis based on Zoom speaker talking events, Zoom provides the option to generate a TIMELINE file that includes all the speakers talking time stamps.
Step #1: Initial setup:
Go to your Zoom account and make sure recording is allowed and check the option “Settings” → “Recordings” → “Add a timestamp to the recording”
Step #2: Start Recording in the same time Stream API “Start” request got conversationId response
In order to have the same start time stamp for TIMELINE speaker talking events and Symbl listening mode make sure your recording (And start live streaming from Zoom in case you are using RTMP) starts at the same time you get the conversationId from Symbl’s Stream API “Start” response.
Step #3: Stopping Recording and Stream API “Stop” request in the same time
Make sure to stop recording at the same time you send the Stream API “Stop” request for timestamp consistency.
Step #4: Meeting is completed – Get Zoom meeting TIMELINE file
In order to get the meeting TIMELINE file use Zoom GET meeting recording API and from the JSON response download the ‘file_type’ TIMELINE URL.
Here is a TIMELINE.json result example:
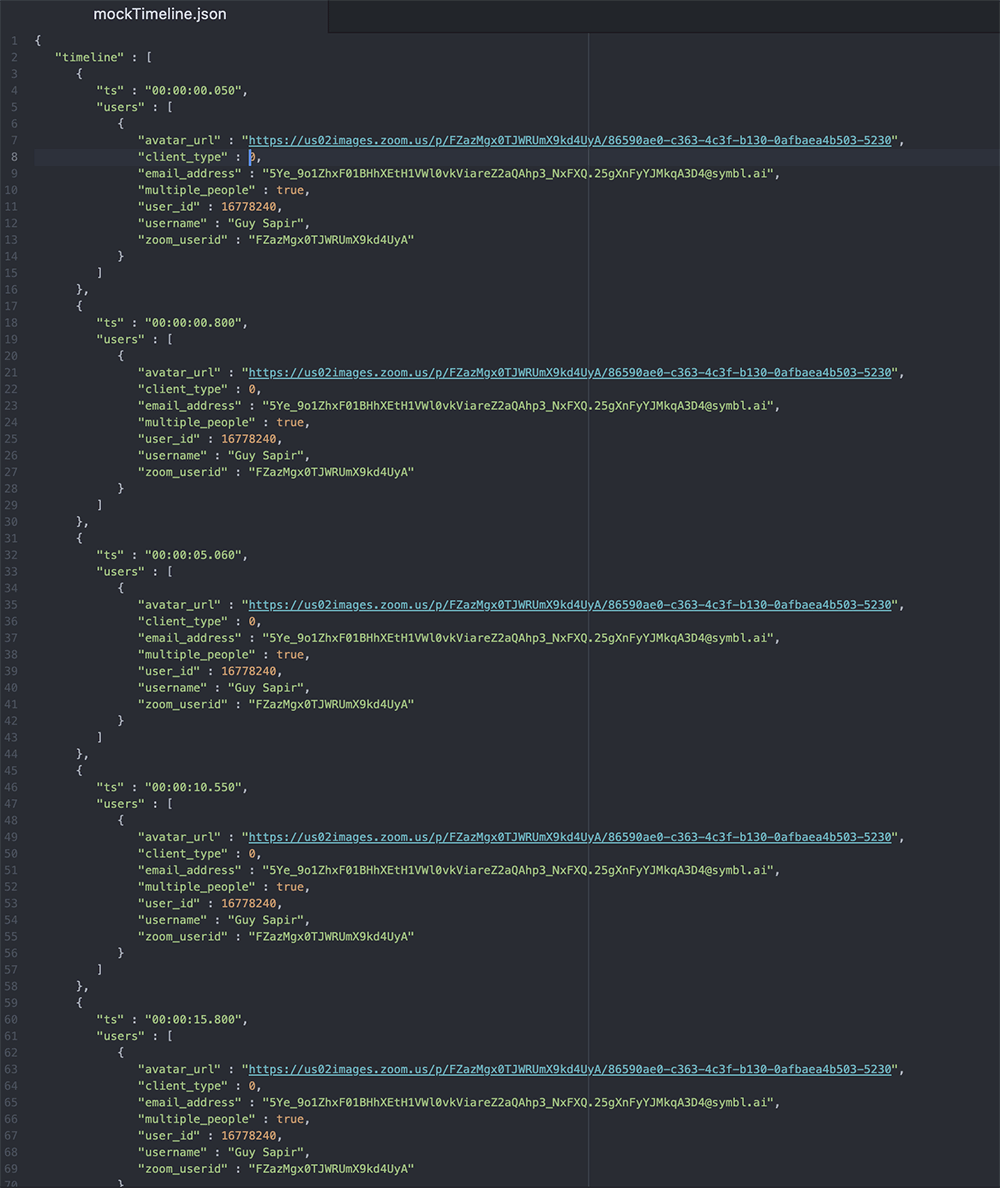
Note: TIMELINE file is available by Zoom only for “Business” plans or above. If you currently using “Pro” or “free” accounts you can skip Steps #4, #5 and #6
Step #5: Convert TIMELINE file to Symbl.ai Speaker Events format
We have an open-source utility written in JS to convert your Zoom conversation TIMELINE.json file from Zoom APIs to match the Speaker Events request format available, which you can modify accordingly to your project/app needs
How to convert a Zoom TIMELINE file to Symbl Speaker events?
- First download the git repo by running command line or terminal: “git clone https://github.com/symblai/speaker-events-converter”
- Enter to the zoom folder by running “cd speaker-events-converter/example/zoom”
- Rename the “TIMELINE.json” you got from Zoom to “mockTimeline.json” and copy this file instead of the existing file in the same directory ../speaker-events-converter/example/zoom/
- Run the command “node index.js” in the same directory to convert the mockTimeline file to a speaker events structure.
- Copy the speaker events json result to be used in Symbl Speaker API. Result example:

Step #6: Update your conversation with Speakers API
To update your conversation with the speakers, have your Symbl token, conversationId and the json result of speaker events (In the previous step) add it to the speakers API as shown in this example and run it:
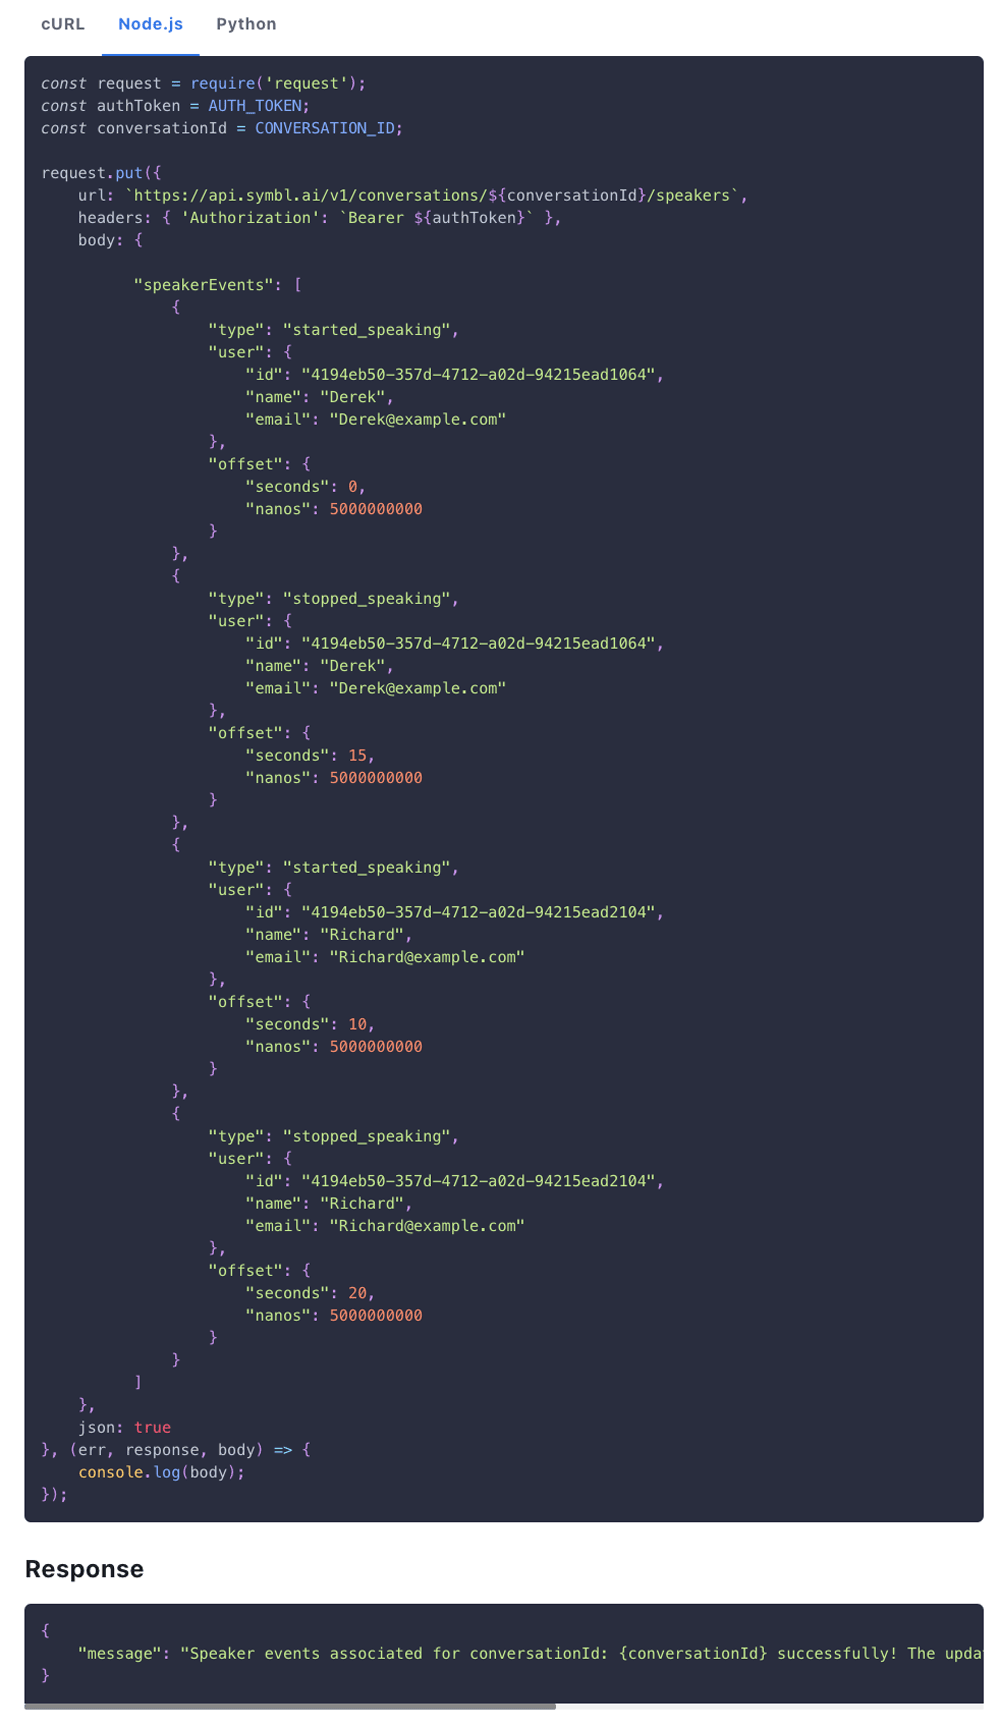
Note: Here are more details about how to send >Symbl’s Speaker API and speaker events
Here is an illustration getting real-time transcripts and insights in a Zoom call over live streaming. The APIs used in >postman and were sent to Zoom and Symbl and with a javascript script that run the subscribe API over a WebSocket we received the transcript and insights from Symbl:

Next steps: Try it yourself!
So far we built together an infrastructure for a voice assistant to run in your app that can provide in a live Zoom conversation real-time transcriptions and insights and at the end of the call added speaker separation in a few simple steps so every message, follow up, action items etc. will have its own speaker owner instantly.
But there is more… you can send the live insights for tasks like follow-ups and action items to the relevant assignee, or to a downstream system. With ConversationId you can unlock Summary based of the conversation context to be send at the end of the meeting, sentiments analysis in message and topics level to understand if there were negative or positive sections in the call flow, Analytics of speaker ratio to understand if all participants got to express themself and more. Explore Symbl conversation APIs and Pre-Built UI to get instant Summary UI of multiple conversation elements in one place.
This conversation intelligence voice assistant can be expanded to a deeper analysis like call centers, coaching and training, meeting summary, data aggregations, indexing to search in real-time Webinars conversations and more.
Other Useful Guides
How to Use WebSockets in Your Voice/Video Appd
Once you have Symbl.ai RTMP stream destination details from managed-stream API use these details to update…

How to Use WebSockets in Your Voice/Video Appd
Once you have Symbl.ai RTMP stream destination details from managed-stream API use these details to update…

How to Use WebSockets in Your Voice/Video Appd
Once you have Symbl.ai RTMP stream destination details from managed-stream API use these details to update…
