
How to Use Symbl’s Voice API Over WebSocket to Generate Real-time Insights
Live, real-time voice streaming over the web functionality is becoming more relevant as companies, who once met in person, are building applications to communicate remotely online. Streaming real-time audio through desktop apps, podcast interfaces, or WebRTC based platforms, you can broaden your conversation intelligence capabilities by using Symbl’s Voice API with WebSocket integration. Integrate our API with CPaaS platforms like Tokbox and Agora.io to receive actionable insights, transcriptions, and summary topics in real time. It’s instant gratification at its finest. This blog post will break down Symbl’s Voice API over WebSocket into different pieces and help you integrate it into a custom application and start generating insights in real-time.
Requirements
Before we can get started, you’ll need to make sure to have: – Node JS installed on your system. – A Symbl account.
Getting Started
First, create an index.js file where we will be writing all our code. To work with the API, you must have a valid app id and app secret. If you don’t already have your app id or app secret, log in to the Symbl platform to get your credentials. For any invalid appId and appSecret combination, the API will throw a 401 Unauthorized error.
Input Stream
The WebSocket API needs a stream of audio as an input through a medium such as Twilio Media Streams. For this blog, we’ll configure your microphone to push speaking events to the API. | In the example below, we’ve used the websocket npm package for WebSocket Client, and mic for getting the raw audio from microphone. Run the below command in your terminal
npm i websocket mic| Add the code below to your index file
const WebSocketClient = require("websocket").client; const mic = require("mic"); const micInstance = mic({ rate: "44100", channels: "1", debug: false, exitOnSilence: 6 }); // Get input stream from the microphone const micInputStream = micInstance.getAudioStream(); let connection = undefined; Next we need to create a websocket client instance and handle the connection. This is where we will send speaker events through the websocket and configure the insights we want to generate.
const ws = new WebSocketClient(); // handle any errors ws.on('connectFailed', (err) => { console.error('Connection Failed.', err); }); ws.on('connect', (connection) => { // Start the microphone micInstance.start(); connection.on('message', (data) => { if (data.type === 'utf8') { const { utf8Data } = data; console.log(utf8Data); // Print the data for illustration purposes } }); console.log('Connection established.'); connection.send(JSON.stringify({ "type": "start_request", "insightTypes": ["question", "action_item"], "config": { "confidenceThreshold": 0.9, "timezoneOffset": 480, // Your timezone offset from UTC in minutes "languageCode": "en-US", "speechRecognition": { "encoding": "LINEAR16", "sampleRateHertz": 44100 // Make sure the correct sample rate is provided for best results }, "meetingTitle": "Client Meeting" }, "speaker": { "userId": "[email protected]", "name": "Jane" } })); micInputStream.on('data', (data) => { connection.send(data); }); For this example, we timeout our call after 2 minutes but you would most likely want to make the stop_request call when your websocket connection ends
// Schedule the stop of the client after 2 minutes (120 sec) setTimeout(() => { micInstance.stop(); // Send stop request connection.sendUTF(JSON.stringify({ "type": "stop_request" })); connection.close(); }, 120000); }); ws.connect( 'wss://api.symbl.ai/v1/realtime/insights/1', null, null, { 'X-API-KEY': '' } ); Let’s break apart the code blocks and analyze them closely.
micInstance.start(); This simply begins streaming audio through your microphone. For this blog, we are using your computer’s microphone but you can use a variety of mediums as the input to stream audio data such as a phone call.
connection.on('message', (data) => { if (data.type === 'utf8') { const { utf8Data } = data; console.log(utf8Data); // Print the data for illustration purposes } }); This block is just for illustration purposes to see the data that is being streamed. Depending on your use case, you can do many things with this data prior to calling our API on it.
connection.send(JSON.stringify({ "type": "start_request", "insightTypes": ["question", "action_item"], "config": { "confidenceThreshold": 0.9, "timezoneOffset": 480, // Your timezone offset from UTC in minutes "languageCode": "en-US", "speechRecognition": { "encoding": "LINEAR16", "sampleRateHertz": 44100 // Make sure the correct sample rate is provided for best results }, "meetingTitle": "Client Meeting" }, "speaker": { "userId": "[email protected]", "name": "Jane" } })); The above code is the payload configuration for the API call. This is where you set the start_request option, the insightTypes we want to identify as well as other configurations for confidence and speech recognition. We also pass in a speaker object that has the user’s name and email for the speaker event that we are sending.
micInputStream.on('data', (data) => { connection.send(data); }); The above code just sends the data when audio is detected in your microphone.
// Schedule the stop of the client after 2 minutes (120 sec) setTimeout(() => { micInstance.stop(); // Send stop request connection.sendUTF(JSON.stringify({ "type": "stop_request" })); connection.close(); }, 120000); }); ws.connect( 'wss://api.symbl.ai/v1/realtime/insights/1', null, null, { 'X-API-KEY': '' } ); Finally, for this demo, we use the setTimeout to trigger our stop_request option after 2 minutes to stop the call. In production, however, you would trigger this option once your call or meeting actually ends. To make the connection, we use the ws.connect option with the API endpoint and our access token that we generated at the start.
Running your code
Now that we have everything set up, let’s test our code. In your terminal run node index.js. In your console, you should see logs like Connection established. If you begin speaking, you should also start seeing data logs and if you speak phrases that are detected as questions or action items, you’ll see that data get logged as well.
Output
This is an example of the summary page you can expect to receive at the end of your call: 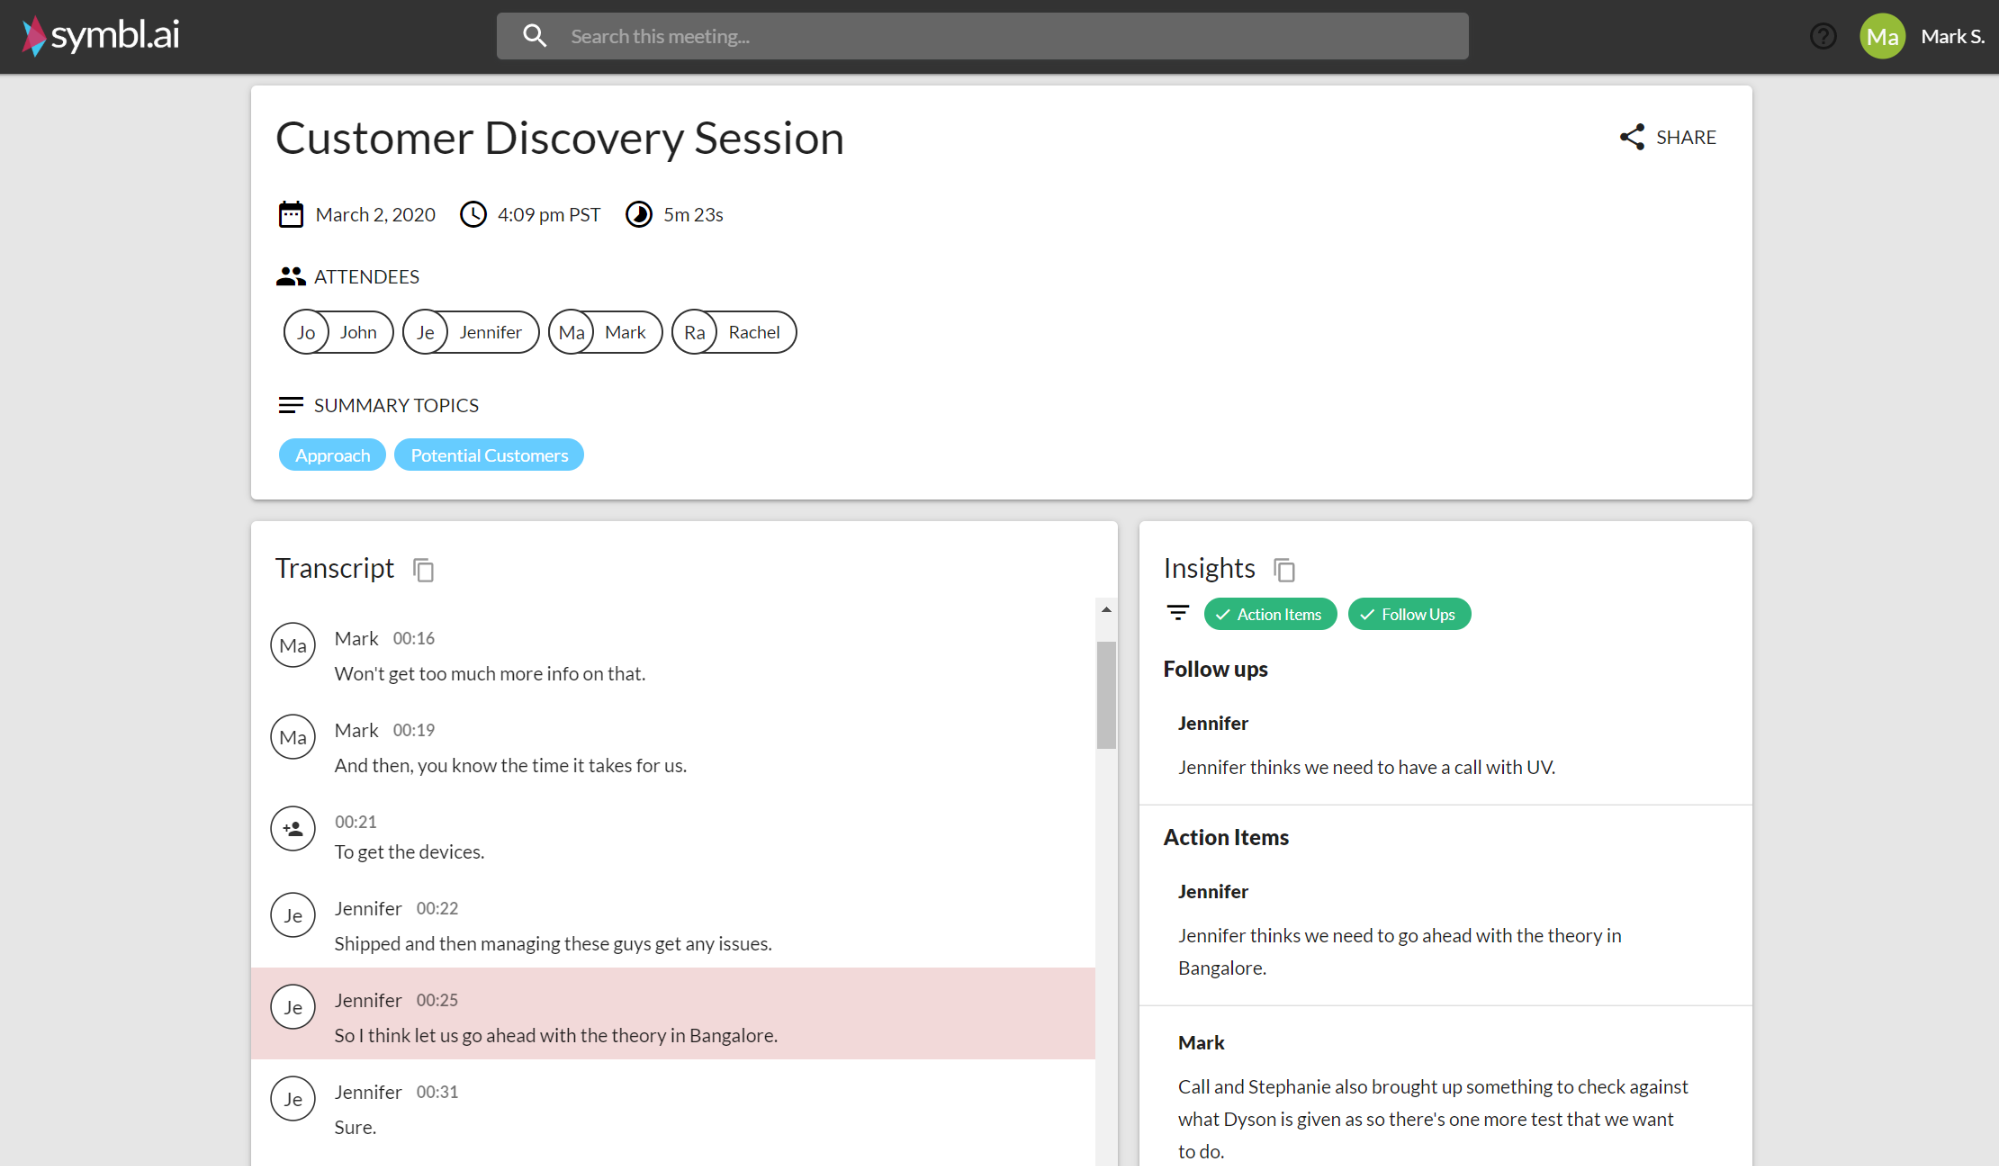
Tuning your Summary Page
You can choose to tune your Summary Page with the help of query parameters to play with different configurations and see how the results look.
Query Parameters
You can configure the summary page by passing in the configuration through query parameters in the summary page URL that gets generated at the end of your meeting. See the end of the URL in this example: `https://meetinginsights.symbl.ai/meeting/#/eyJ1…I0Nz?insights.minScore=0.95&topics.orderBy=position`
| Query Parameter | Default Value | Supported Values | Description |
|---|---|---|---|
insights.minScore |
0.8 | 0.5 to 1.0 | Minimum score that the summary page should use to render the insights |
insights.enableAssignee |
false | [true, false] | Enable to disable rending of the assignee and due date ofthe insight |
insights.enableAddToCalendarSuggestion |
true | [true, false] | Enable to disable add to calendar suggestion whenapplicable on insights |
insights.enableInsightTitle |
true | [true, false] | Enable or disable the title of an insight. The title indicates theoriginating person of the insight and if assignee of the insight. |
topics.enabled |
true | [true, false] | Enable or disable the summary topics in the summary page |
topics.orderBy |
‘score’ | [‘score’, ‘position’] | Ordering of the topics. <br><br> score – order topics by the topic importance score. <br><br>position – order the topics by the position in the transcript they surfaced for the first time |
score – order topics by the topic importance score. position – order the topics by the position in the transcript they surfaced for the first time |
Wrapping up
Congratulations, you now know how to use Symbl’s real-time WebSocket API to generate your own insights. Sign up to start building! Need additional help? You can refer to our API Docs for more information and view our sample projects on Github.