
Raw audio streams—which provide uncompressed audio data—are beneficial when you want to do something with the audio, such as generating transcripts in real-time or conducting sentiment analysis. In the compressed audio format, quality is compromised to maintain the file size, which can result in data loss or other undesirable issues with the data. Using the raw audio stream, however, means that captured data is unaltered, which provides a better opportunity to read and analyze the audio in its original form.
In this article, you’ll learn how to extract the raw audio stream from Zoom and use it for a project to create real-time transcripts.
The Need for Raw Audio Streams
As you can see, the benefit of raw audio streams is that you can use the uncompressed data to build something and get results in real-time. Before we start the tutorial, let’s dig deeper into a few common use cases for this data:
Real-Time Sentiment Analysis
Sentiment analysis or opinion mining is a Natural Language Processing (NLP) application that helps to identify if a given piece of data has positive, negative, or neutral sentiments. Real-time sentiment analysis is a great tool to get feedback from users even without asking them. You can get feedback during a call on how people are reacting when a specific ad is running or even understand if the user is happy or angry using sentiment analysis.
Transcription
Another critical use case of getting raw audio is that you can get transcription from the audio in real-time. This functionality has many practical uses, such as captioning live videos or podcasts or transcribing phone calls or training sessions instantly. In addition to the benefits of generating transcription in real-time, doing so from raw audio is also highly cost-effective.
Capturing Action Items
Action items are tasks assigned to one or more participants, which are logged in meeting minutes and are meant to be reported upon once the job is complete. Because the success of a session depends on successful action items, it is crucial to record the action items accurately. Capturing action items from raw audio can help automate the process of recording these critical pieces of information instead of requiring inefficient manual efforts to do so.
Getting Raw Audio from Zoom
Now that you understand the benefits of using raw audio data, let’s begin the tutorial for retrieving it. Getting raw audio from Zoom can have multiple approaches. If you are familiar with building desktop or mobile applications, you can use the Zoom Desktop or mobile SDKs to extract the raw audio from any meeting. Zoom also has a web SDK, but extracting audio from a meeting is not possible with it.
However, this article will use the Symbl.ai SDK to extract the audio from Zoom. Symbl.ai provides a JavaScript SDK to do so using PSTN mode, which makes use of the circuit-switched telephone network to connect with another participant.
Prerequisites
To continue with this article, be sure to complete these essential prerequisites. You’ll need:
– An understanding of JavaScript (with knowledge of asynchronous programming).
– A Symbl.ai free developer account.
– A Zoom account (with a pro plan or above).
Once these prerequisites have been met, let’s dive into the tutorial.
Getting the Symbl.ai SDK Key and Secrets
After creating an account with Symbl.ai, you’ll have access to the App ID and App Secret in your dashboard:

Copy both of these and save them in an `.env` file in the directory you are using to build the app. Create a new variable called APP_ID to hold the value of app ID, and create another variable called APP_SECRET to hold the value of app secret.
You’ll get ten thousand minutes of free conversion available with one free account, which should be plenty to get you started.
Initializing the Project and Zoom SDK
Once you have the App ID and the App Secret, you can start working on the project. First, initialize a folder with NPM using npm init and install a few dependencies: @symblai/symbl-js and dotenv. Use the following code to do so:
npm i @symblai/symbl-js dotenvOnce the dependencies are installed, create a file, perhaps index.js or app.js, and initialize the dotenv package at the top. The dotenv package loads the environmental variables to process.env.
After initializing the directory and installing the dependencies, the next step requires the necessary packages in your file. For this article, you’ll only need the sdk constructor from the @symblai/symbl-js:
require('dotenv').config();

const { sdk } = require('@symblai/symbl-js');
Now, you’ll have to initialize the basic data into variables that will be needed when connecting to Zoom:
const appId = process.env.APP_ID
const appSecret = process.env.APP_SECRET
const phoneNumber = '+12532158782';
const meetingName = 'YOUR MEETING NAME';

const ZOOM_PARTICIPANT_ID = '191412';
const ZOOM_MEETING_ID = '89725538754';
const ZOOM_MEETING_PASSCODE = '403804';
The phone number, meeting name, participant ID, meeting ID, and meeting passcode can be found in the meeting invitation.
You can also get the phone number, meeting ID, and meeting passcode from the meeting invitation text. To get the participant ID, you can click on the green icon that’s available on your Zoom app after starting a meeting:
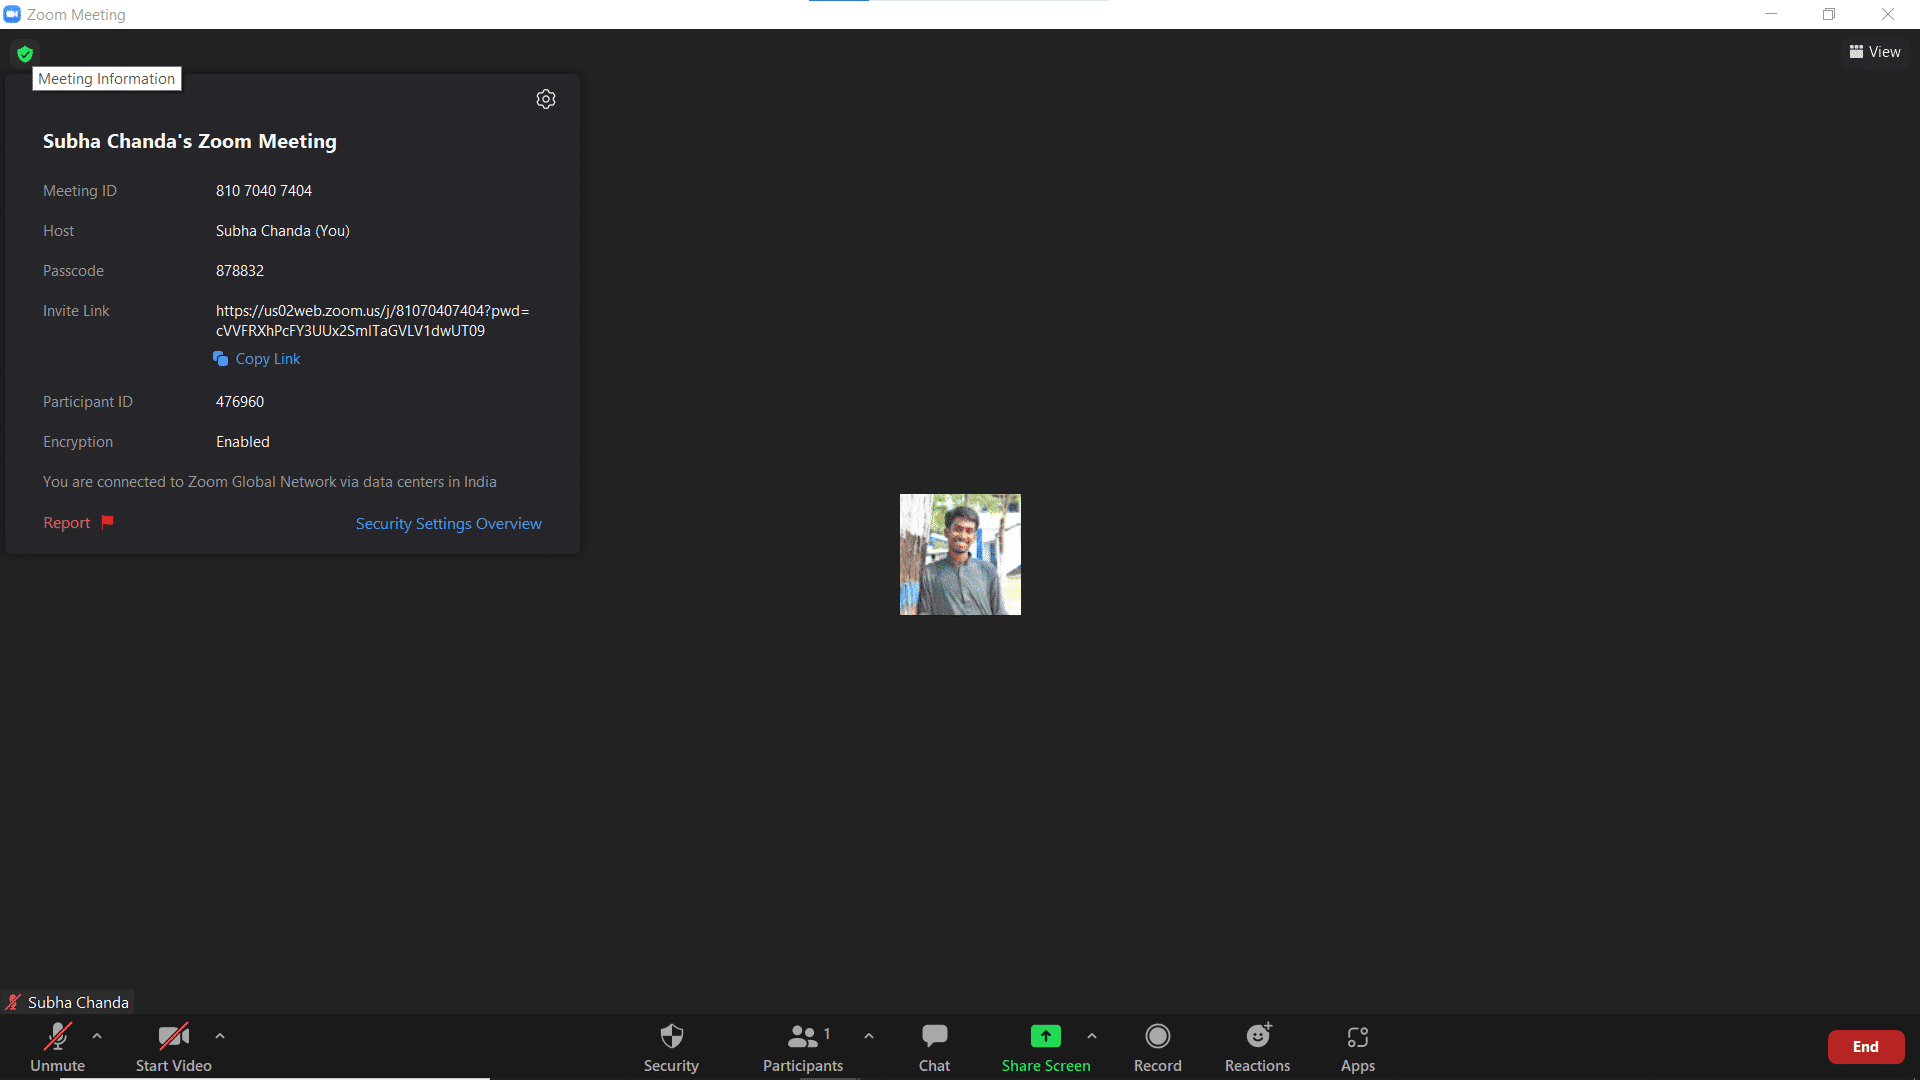
One thing to note here is that only numeric passcodes are allowed when connecting using PSTN, so remember to copy the passcode that only has numeric content.
Once you have the necessary values, you can set up the DTMF sequence to initialize the SDK. Dual Tone Multi-Frequency (DTMF) is the tone generated when dialing a phone number. These tones are transmitted through the voice channel. When using the PSTN method, the DTMF is used to send the necessary information for the connection.
To set up the DTMF sequence, create a new variable and assign it with the following value:
let dtmfSequence = `${ZOOM_MEETING_ID}#`;

if (ZOOM_PARTICIPANT_ID) {
  dtmfSequence += `,,${ZOOM_PARTICIPANT_ID}#`;
} else {
  dtmfSequence += `,,#`;
}

if (ZOOM_MEETING_PASSCODE) {
  dtmfSequence += `,,${ZOOM_MEETING_PASSCODE}#`;
}
The DTMF sequence, depending on various values, is set up using the if-else conditions.
Next, you can create an immediately invoked function expression to initialize the SDK. Here’s an example:
(async () => {
  try {
    // Initialize the SDK
    await sdk.init({
      appId: appId,
      appSecret: appSecret,
      basePath: 'https://api.symbl.ai',
    });

    console.log('SDK Initialized');

    const connection = await sdk.startEndpoint({
      endpoint: {
        type: 'pstn',
        phoneNumber: phoneNumber,
        dtmf: dtmfSequence,
      },
      data: {
        session: {
          name: meetingName,
        },
      },
    });

    const connectionId = connection.connectionId;
    console.log('Successfully connected. Connection ID: ', connectionId);

    console.log('Subscribing to the live events on the connection.');
  } catch (e) {
    console.log(e);
  }
})();
Inside a try-catch block, you have to initialize the Symbl SDK first. The SDK is initialized with the sdk.init method, which takes an object as a parameter to pass in the App ID, App Secret, and the base path, https://api.symbl.ai. Then, a console statement is added to confirm if the SDK is initialized.
Once complete, you can connect with the API using the sdk.startEndpoint method. In this method, you have to define the endpoint. Optionally, you can also add an action to happen during the call or after the call ends. For example, you can trigger an email holding a summary of the data to send once the meeting ends.
The endpoint object consists of the type of connection that you are making. Currently, only PSTN mode is supported to connect to Zoom. After specifying the connection type, you have to provide the phone number to which the connection will be established and the DTMF sequence. Next, provide the meeting name you are trying to connect to in the data object.
You can try running your code at this stage. If you provide the necessary details correctly, you’ll see that a number is attempting to be admitted into your meeting:
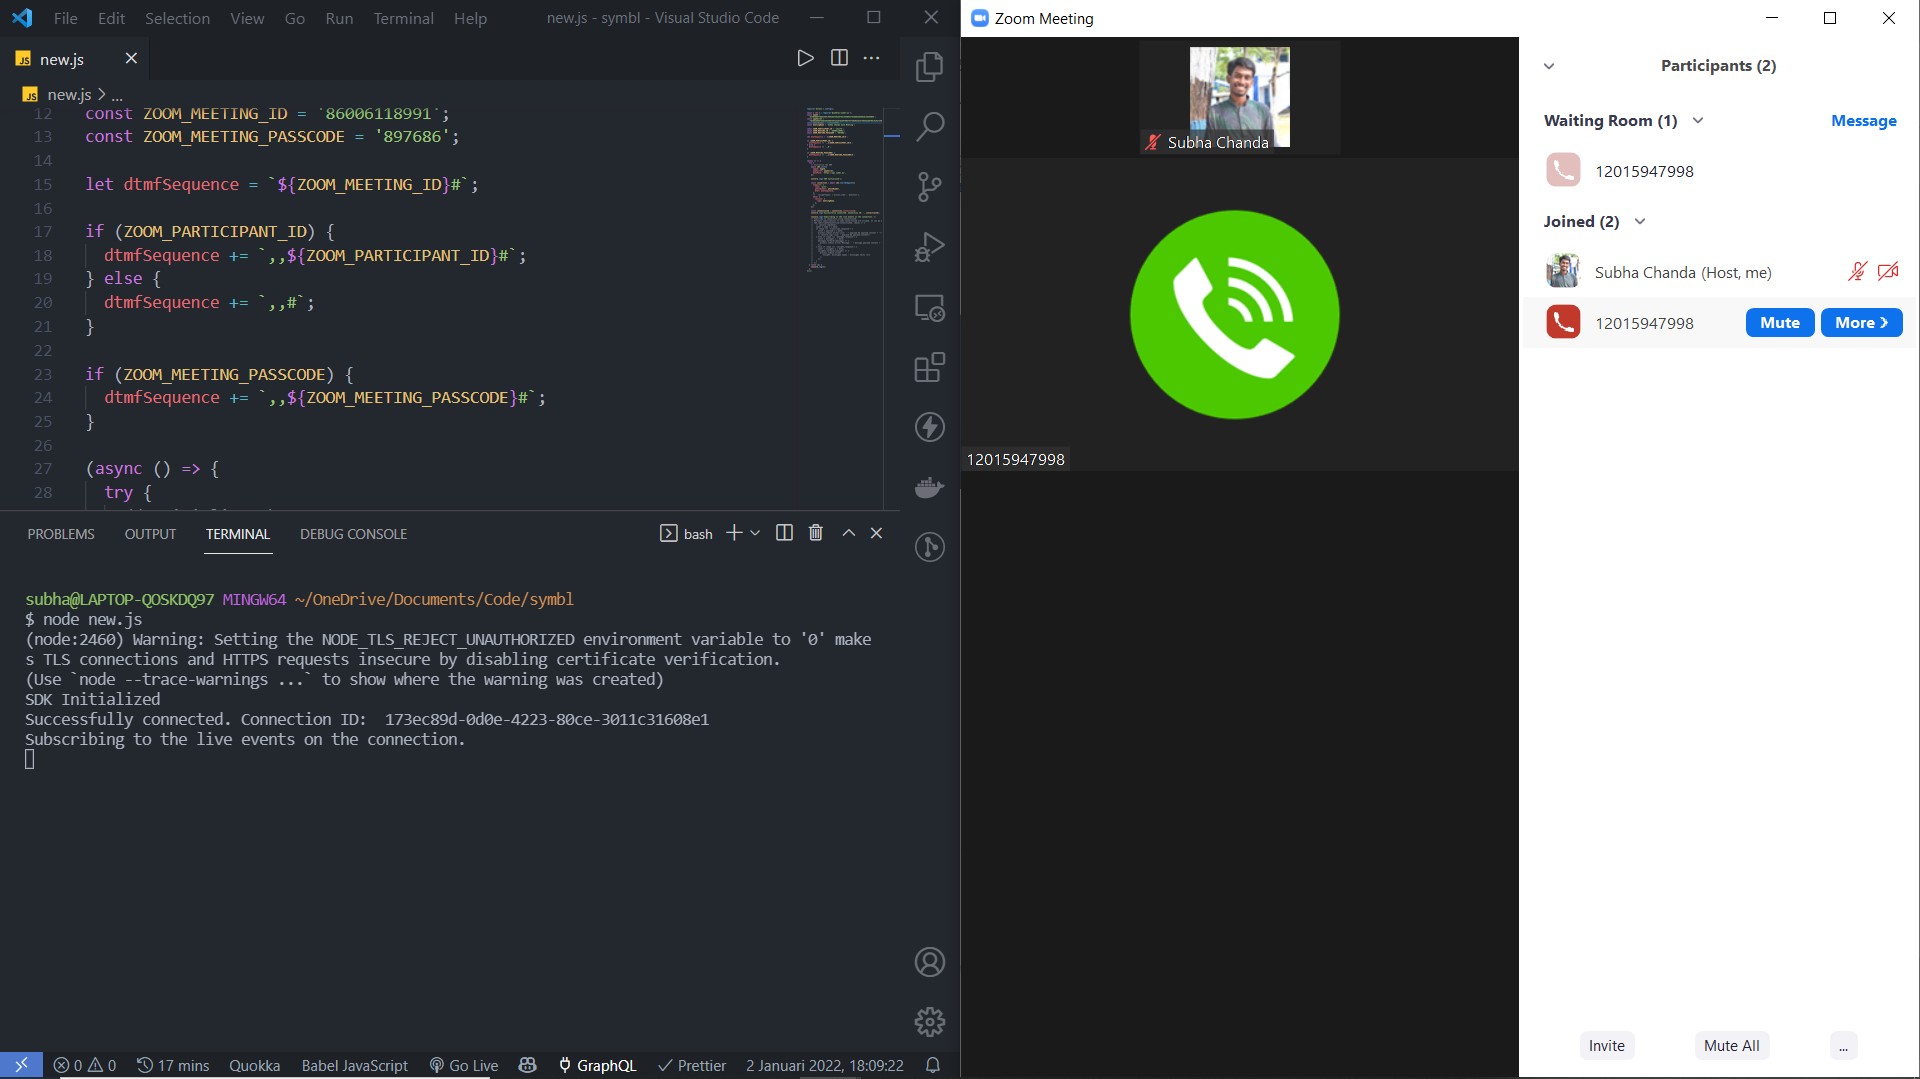
It typically takes thirty to sixty seconds to receive the request. Once you do, it means you have successfully connected the Symbl SDK with Zoom.
You may have noticed this line in the code above:
const connectionId = connection.connectionId;
Once you have retrieved the connection ID of the session, you can begin to use the raw audio data.
Getting Real-Time Transcripts from Zoom
Now that the SDK is initialized and the connection is established, you can generate real-time transcriptions using the connection ID. Let’s see how that can be achieved.
To begin, you’ll have to subscribe to the event in the established connection. The subscribeToConnection method is used here for the subscription. This method takes two arguments: the first is the connection ID, and the second is a callback function that fires up for every event that happens in the connection.
Here’s the callback function to get the transcript and write it to the console:
sdk.subscribeToConnection(connectionId, (data) => {
      const { type } = data;
      if (type === 'transcript_response') {
        const { payload } = data;
        process.stdout.write('Live: ' + payload && payload.content + '\r');
      } else if (type === 'message_response') {
        const { messages } = data;
        messages.forEach((message) => {
          process.stdout.write('Message: ' + message.payload.content + '\n');
        });
      }
    });
As you can see, the first thing is to restructure the type from the data. The data is being outputted in the console, depending on the type of response: a transcript response or a message response.
After adding the above snippet to your try block, if you run the code now, you’ll be able to see the transcription:
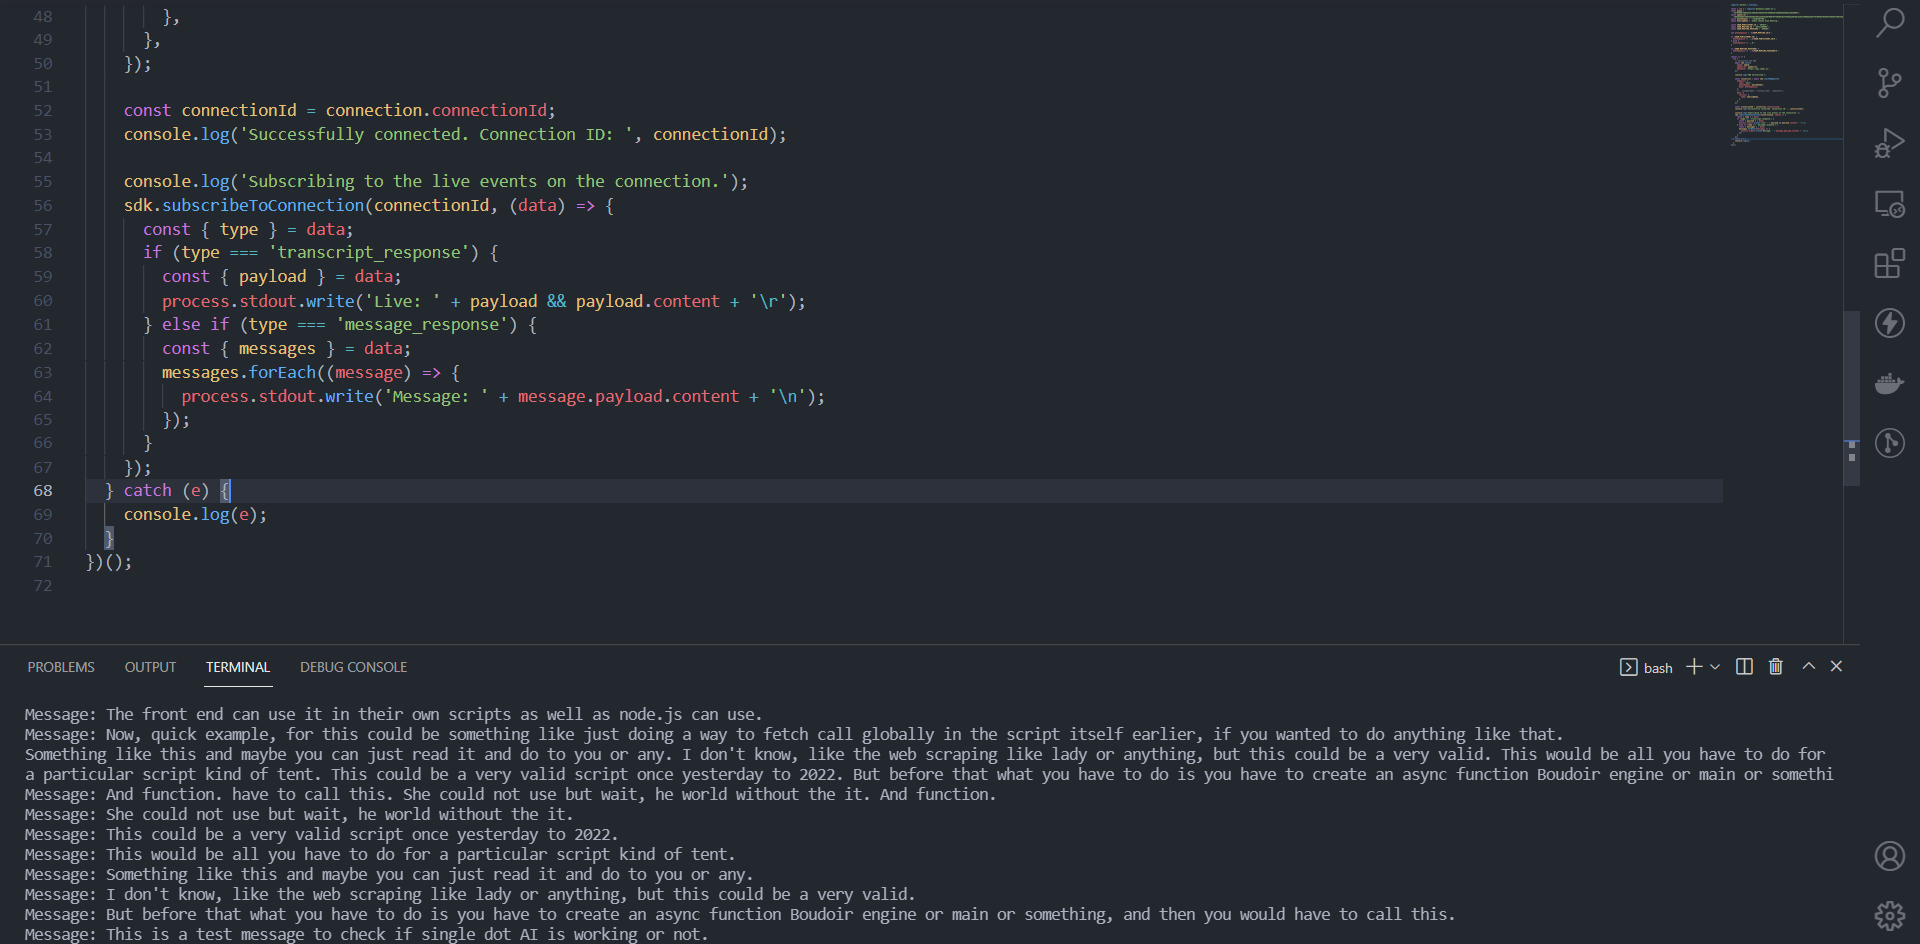
It’s up to you now how you want to use it. You can use this response to analyze the sentiments of this message, capture the action items of a meeting, or even just to generate real-time transcriptions to keep notes of the meeting.
The full code for this article is shown below:
require('dotenv').config();

const { sdk } = require('@symblai/symbl-js');
const appId = process.env.APP_ID
const appSecret = process.env.APP_SECRET
const phoneNumber = '+13462487799';
const meetingName = 'Zoom Meeting Name';

const ZOOM_PARTICIPANT_ID = 'PARTICIPANT ID';
const ZOOM_MEETING_ID = 'MEETING ID';
const ZOOM_MEETING_PASSCODE = 'PASSCODE';

let dtmfSequence = `${ZOOM_MEETING_ID}#`;

if (ZOOM_PARTICIPANT_ID) {
  dtmfSequence += `,,${ZOOM_PARTICIPANT_ID}#`;
} else {
  dtmfSequence += `,,#`;
}

if (ZOOM_MEETING_PASSCODE) {
  dtmfSequence += `,,${ZOOM_MEETING_PASSCODE}#`;
}

(async () => {
  try {
    // Initialize the SDK
    await sdk.init({
      appId: appId,
      appSecret: appSecret,
      basePath: 'https://api.symbl.ai',
    });

    console.log('SDK Initialized');

    const connection = await sdk.startEndpoint({
      endpoint: {
        type: 'pstn',
        phoneNumber: phoneNumber,
        dtmf: dtmfSequence,
      },
      data: {
        session: {
          name: meetingName,
        },
      },
    });

    const connectionId = connection.connectionId;
    console.log('Successfully connected. Connection ID: ', connectionId);

    console.log('Subscribing to the live events on the connection.');
    sdk.subscribeToConnection(connectionId, (data) => {
      const { type } = data;
      if (type === 'transcript_response') {
        const { payload } = data;
        process.stdout.write('Live: ' + payload && payload.content + '\r');
      } else if (type === 'message_response') {
        const { messages } = data;
        messages.forEach((message) => {
          process.stdout.write('Message: ' + message.payload.content + '\n');
        });
      }
    });
  } catch (e) {
    console.log(e);
  }
})();
Conclusion
In this article, you have seen how to connect Zoom to Symbl.ai to retrieve raw audio data and then use it to generate real-time transcription.
You can refer to Symbl.ai’s SDK reference to explore their other features. They currently provide Python and JavaScript SDK, but it’s also possible to implement the same features using their API.
About Subha Chanda
Subha is a freelance web developer and a learner who is always passionate about learning and experimenting with new things. He loves to write about his new learnings and experiences.
Twitter: @Ami_Subha